
 Prestashop

Summary
The main features of this module are:
Simplified configuration
Direct call to the payment page
Server-to-server call for guaranteed insertion and closing of orders
Multi-shop support
Multi-language support
iFrame payment support
Payment management integrated in orders page
Token support and one-click payment
View transactions list
Prestashop versions compatibility:
from version 8.0 onwards
Compatibility is not guaranteed if there are installed modules that modify the normal checkout flow.
Install
You can install Fabrick Payment Orchestra module for Prestashop as usual, by searching for it in the Modules directory and by clicking on Install.
Otherwise you can browser the plugin from Prestashop Addons directory.
Configuration
Fabrick Payment Orchestra has many options avaliable; you can access the module configuration by clicking on Modules > Modules & Services > Installed Modules. Here, find Axerve and click on Configure.
All the customizable settings are shown:
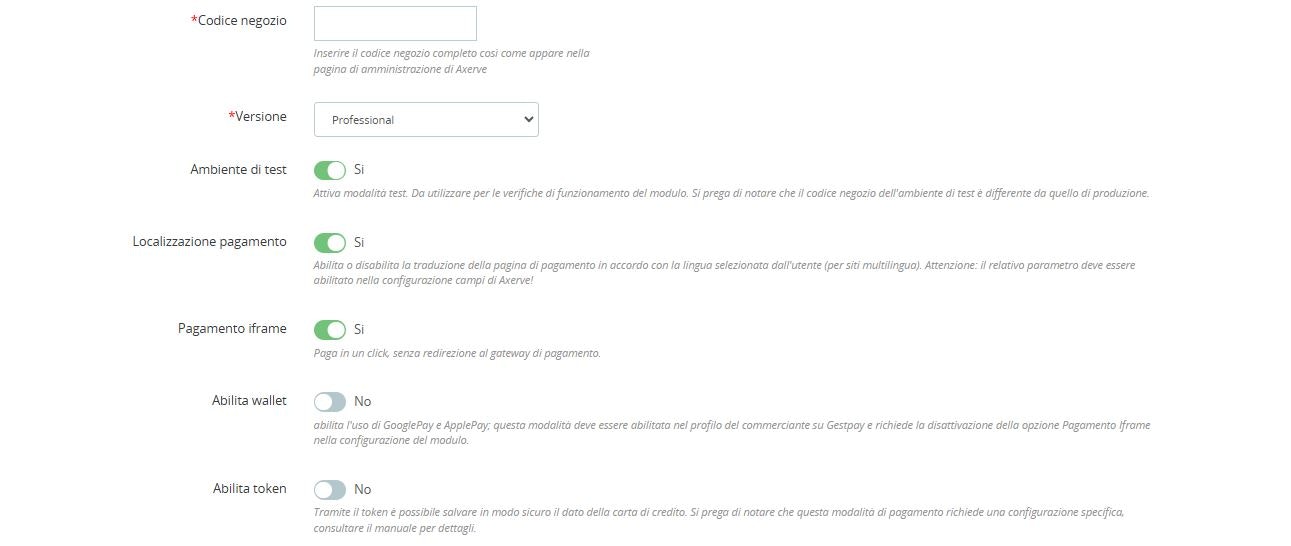
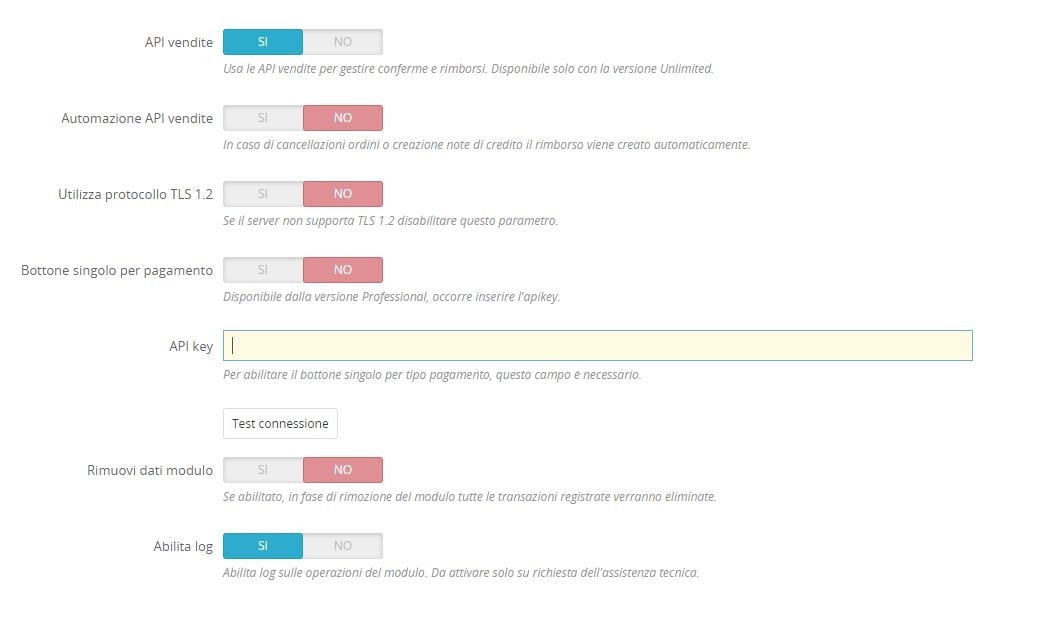
Let’s discuss the parameters and their options.
Shop Login
The shop login code assigned by Fabrick. Note: that the test shop code is different from the production shop code.
Platform
The service version you choose to use (Starter, Professional or Unlimited)
Enable test mode
In test mode, all requests are sent to Fabrick Payment Orchestrapay test environment where no money is involved. When your setup is done, you can switch to production environment.
Enable payment page localization
When this switch is enabled, the customer’s language is passed as a parameter to Fabrick Payment Orchestra, that will translate the payment page accordingly. Note: Check that the language parameter is enabled in Fabrick backoffice.
Enable iFrame payment
Enables the payment form via iframe, so that the payment is handled securely.
Enable Wallet
Option to enable the use of Google Pay and Apple Pay. To use it, these payment methods must also be enabled on the merchant profile in GestPay, and the iFrame option must be disabled in the plugin configuration panel on the PrestaShop backend.
Enable tokens
By enabling this option together with the iFrame solution, the plugin allows to pay with a token instead of a credit card. This token is a secure representation of the credit card that will be saved inside the database.
Use Sales API
Allows to manage in the orders page all the operations on the transaction, without accessing Fabrick backoffice.
Sales API automation
Refunding and Cancelling operations can be performed directly from the order page, without accessing Fabrick backoffice.
Test connection
Click here to check if the connection between your server and Fabrick Payment Orchestra is correctly configured.
Remove data on uninstall
When uninstalling this module, remove tables, transactions and settings from the database.
Enable module debugging mode
Enables logs on module operation. Activate only if requested by the customer care.
Button for each payment method
In the last versions of the plugin, a configuration has been introduced to list each payment method with their own button, as alternative to a list, if iFrame is enabled:
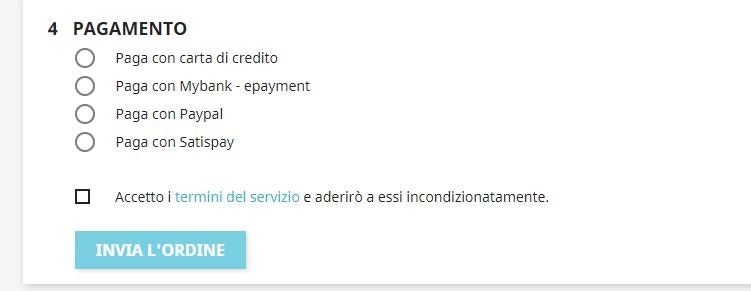
To activate this functionality it is necessary to enter the value of the APIKey that can be created on the merchant profile in Fabrick Payment Orchestra.

In case this function is not activated, there is no need to enter the APIKey and it is necessary to choose the security model based on the IP as an alternative tothe one based on the APIKey in Fabrick Payment Orchestra.
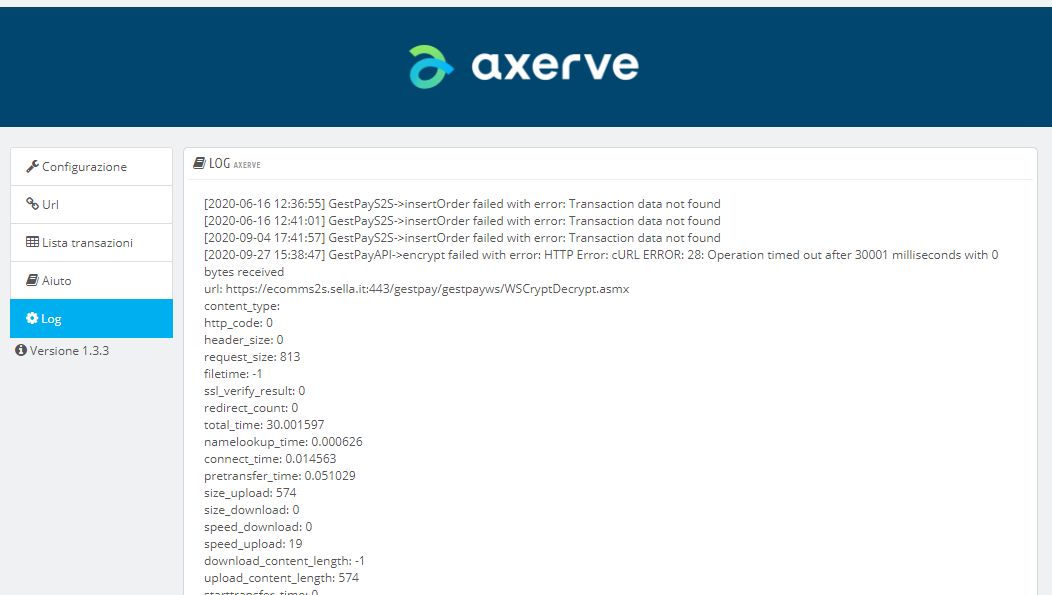
Log Files
The logs can be read by clicking on the Log menu item.
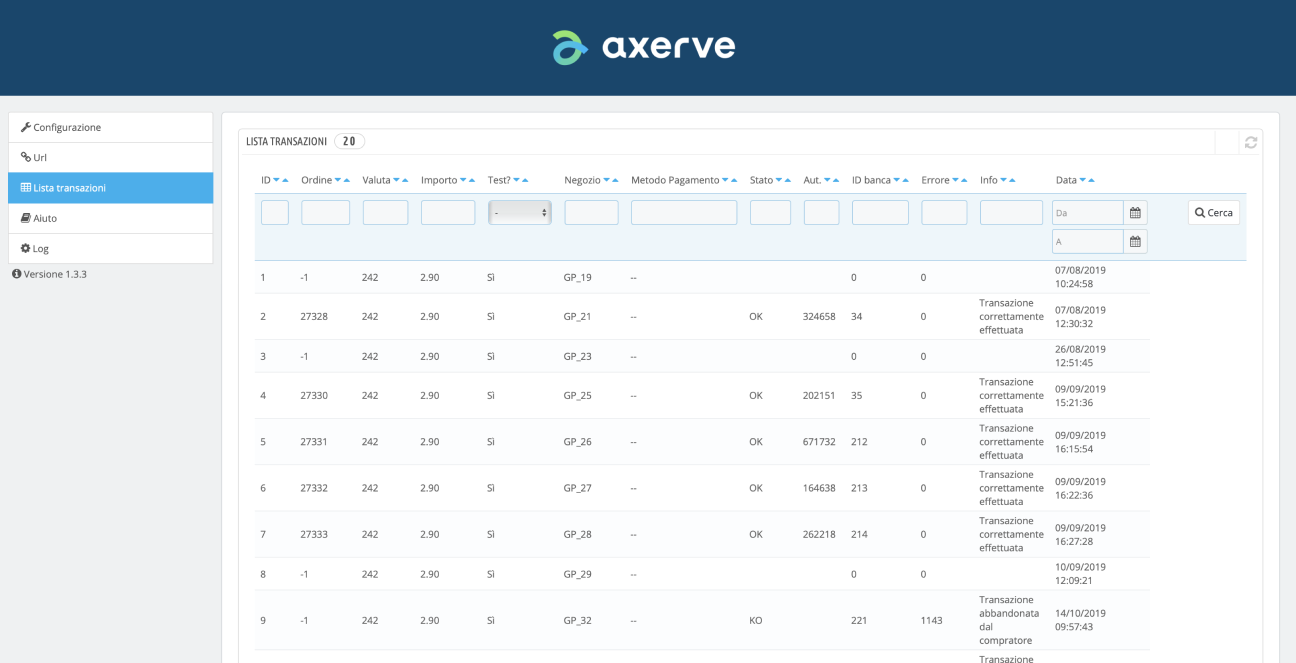
Transactions List
See all transactions and their status by clicking on Transactions Log.
Fabrick Backoffice configuration
Access your merchant back-office (test environment, production environment
) to set up Fabrick Payment Orchestra.
To configure the plugin:
set up response urls
set up the server IP
set up fields & parameters
Set up response urls
Go to Configuration > Environment > Response Address.
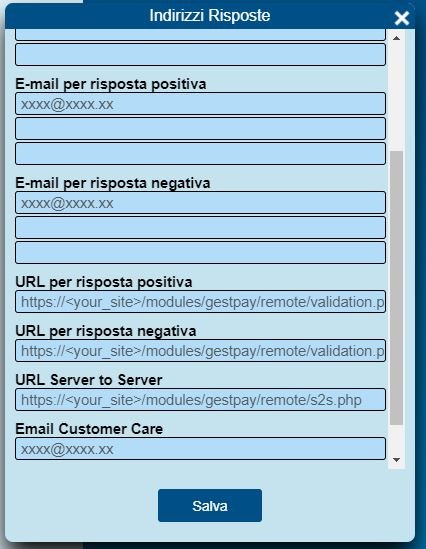
for URL for positive response and URL for negative response, set:
<your domain>/modules/gestpay/remote/validation.php
for URL server to server:
<your domain>/modules/gestpay/remote/s2s.php
The plugin shows these values in the URL section:

Setup IP Address
As of the current version, the plugin operates exclusively with IP address-based security and does not support apiKey-based authentication.
In Configuration > Environment > IP addresses you must insert the server’s IP address.
The plugin shows this value in the URL section, see last image for this.
The IP address shown here might be incorrect; please verify with your hosting service the right external IP.
Useful tip: you can check the IP address, by going in Payment Page > Auto Test and clicking on the last call, assuming you have done at least one call.
Within the back office, the security level must be set as shown in the image below.
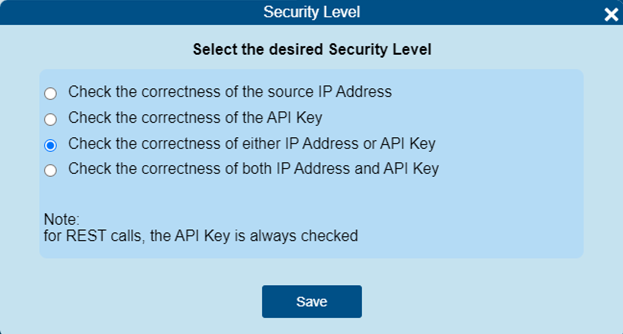
Configuring Fabrick Payment Orchestra - Payment Parameters
The payment page configuration depends on the Platform you choose above. There are two main cases:
Redirection to Fabrick Payment Orchestra payment page
Payment with iframe and token
Parameters can be found in the Merchant Back-Office, by clicking on Payment Page > Fields&Parameters.
To activate a parameter, open the dialog box and check the Parameter checkbox.
The follwing is an example for the PaymentTypes parameter, the others follow the same logic:

Not all parameters are editable.
The most recent versions of the Prestashop plugin have introduced saving of the payment method used in the informative tables of Prestashop. To avoid anomalious behaviour, however, it is necessary to go to Payment Page > Fields&Parameters and to enable, in both pages, the PaymentMethod response parameter, as shown in the following images:

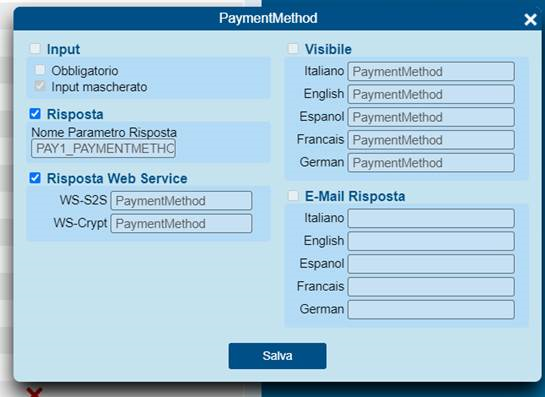
Once you have applied the configuration, remember to click on the Publish button at the top of the page.
Redirection to Fabrick Payment Orchestra Payment Page
In order to pay with the Payment Page, the fields that must be passed are:
Amount
Buyer e-mail
Buyer name
Currency
Language (if you’ve enabled Enable payment page localization in the plugin )
Shop Transaction ID
iFrame and tokens
The setting enable iFrame payment activates an integrated payment page in Prestashop, that allows a secure trasmission of the credit card. The merchant will never see the credit card, at any moment.
If at purchase time the user wants to save the credit card on the website, it will be saved as a token, a non-sensitive datum that can be stored in Database without being PCI compliant, thus enabling one-click payments.
By activating Enable tokens in the payment page the buyer will see a form to insert the credit card:
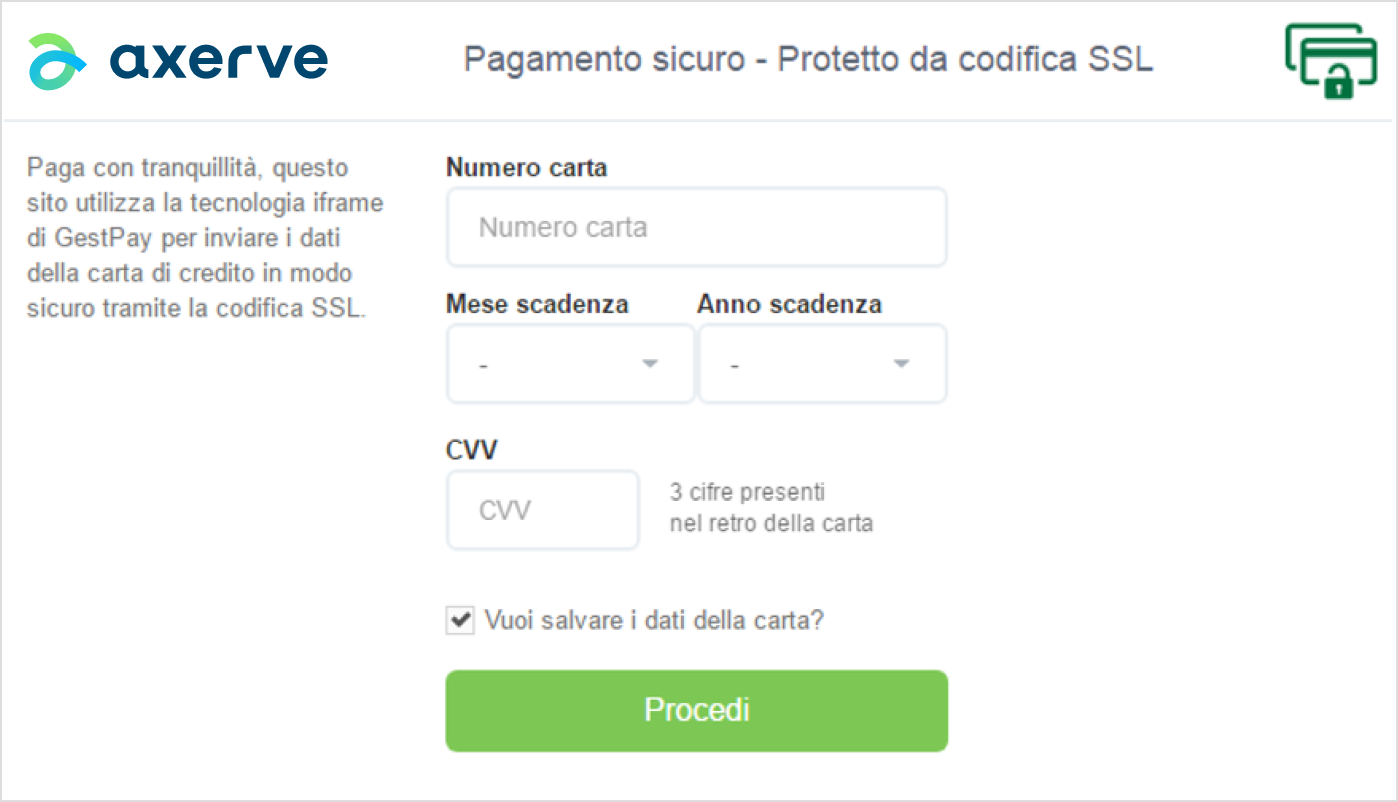
At the end of the transaction, if the customer has decided to save his credit card in the shop, next payments will be done without inserting any credit card number and with just one click:

When the credit card expires, the user will see again the iframe form.
To enable iFrame, Fabrick Payment Orchestra customer support will create a new NO DISPLAY page with its own set of parameters.
Contact the technical support for help.
The configuration of fields & parameters is the same of above.
Use of Tokens
If you enable the Token mode, enable the parameter Token Request.
For these three parameters:
TOKEN
Token Expiry Month
Token Expiry Year
you must also check the Web Service Response checkbox.
Sales API
with the Sales API, you can manage transactions and authorization/reimbusements directly from the orders page.
By activating the Sales API setting, in Orders Management you’ll see a new view with all transaction info:
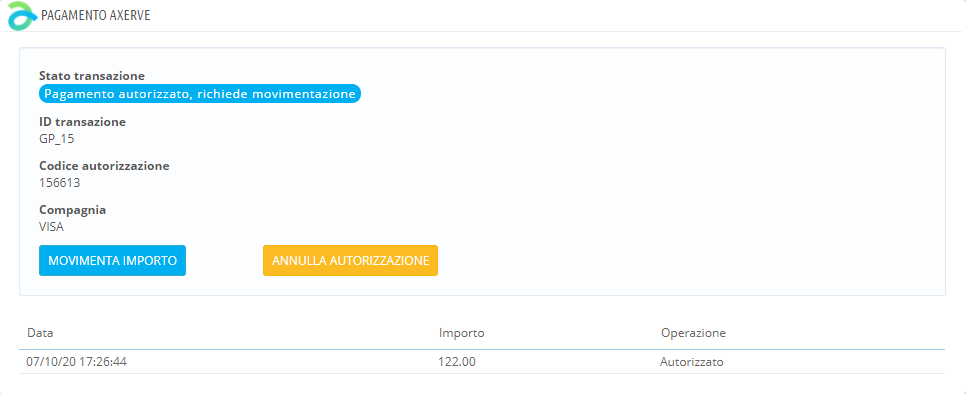
From this view you can:
Settle a transaction (see M.O.T.O. for more info)
Refunds and partial refunds
Settling a transaction is required when there is separation between authorization and settlement (again, see M.O.T.O. for more info).
You can also refund a transaction, until the eventual delete of the transaction. Insert the amount to refund in the textbox and click on Refund. The operation is real-time.
In case the setting Sales API automation is active, some operations on the order will automatically generate refunds in Fabrick Payment Orchestra. For example:
Order status changed in cancelled: it generates a complete refund of the transaction.
Standard refund: generates a refund of the same amount, only if the parameter generate a credit note is selected:
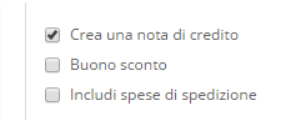
Partial refund: always generates a refund of the same amount.
FabrickPass
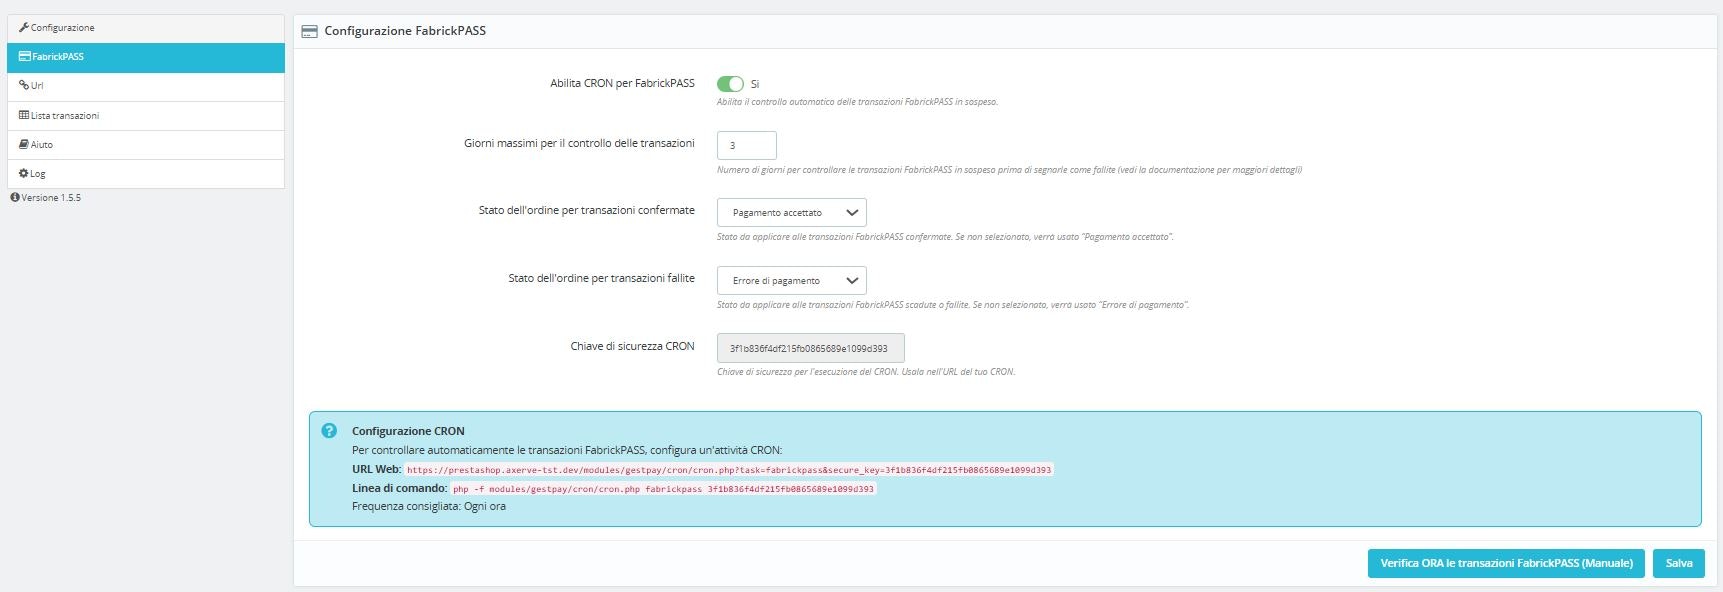
The window above shows the parameters to set for configuring the batch that processes FabrickPass transactions. This is because the method initially returns a waiting status (XX/Waiting), and only after the processing is completed on FabrickPass will the final result of OK/KO be available.
The batch will autonomously reread the orders marked as “Awaiting confirmation (FabrickPass)”:

and will query the Fabrick systems to retrieve the final status.
Note: If, for any reason, the order never receives a final status (due to system errors or an incorrect interruption of the payment flow by the customer), the transaction will remain marked as “Awaiting confirmation (FabrickPass)” and will need to be handled manually by the merchant.
The configurable batch parameters are:
Enable CRON for FabrickPASS
Enable the automatic check of ongoing FabrickPASS transactions.
Max days for checking transactions
Number of days to check pending FABRICKPASS transactions before marking them as failed.
Order state for confirmed transactions
Status for orders with confirmed FabrickPASS payments.
Suggested: Payment Accepted
Order state for failed transactions
Status for orders with failed or expired FABRICKPASS payments.
Suggested: Payment Error
Secure CRON key
Security key for executing the CRON.
Use it in the CRON URL.
Created by the system during installation.
Below are the instructions for configuring the batch on the server where Prestashop is installed:

The batch can also be executed manually at any time by pressing the “Check FabrickPass transactions NOW (Manual)” button at the bottom of the configuration page:

Troubleshooting
The payment button doesn’t show
Verify the list of transactions in the module configuration page. In case you see Error 1142 (invalid IP address) configure the IP address as described above.
At the end of the payment the order is not inserted in the system
There may be different causes:
The Prestashop core has been modified.
The module Php Suhosin is installed; for security reasons this module truncates GET parameters, avoiding a correct communication with Fabrick Payment Orchestra. Modify the parameters max_totalname_length and max_value_length.
Functionality
iFRAME
iFrame
Card saving and token use
Tokenization
Authorization S2S
Enable TOKEN, TOKENEXPMONTH e TOKENEXPYEAR fields in “Fields & Parameters” section of Backoffice
Settle payments
Cancel and settle S2S
Cancel payments
Cancel and settle S2S
Refund
Refund S2S
Google Pay and Apple Pay wallets
With this option enabled, during checkout the button to pay by credit card will display a new label.

When confirming the payment, the following page will open:
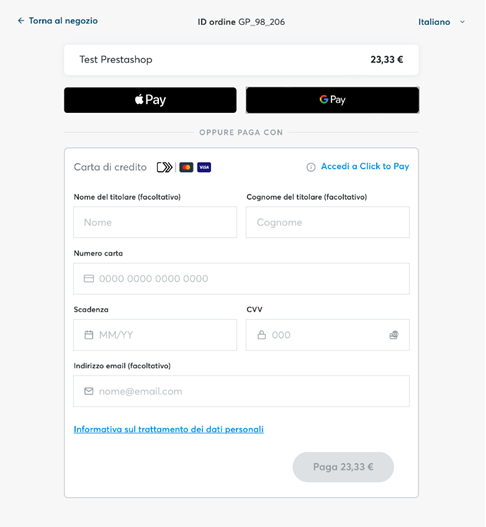
In addition to credit card, the options for Google Pay and Apple Pay will also be available (the latter only if the device is iOS or macOS).