
 WooCommerce
Starting from version 20251027, the WooCommerce plugin developed by Fabrick for integration with the Payment Orchestra payment gateway is fully compatible with the WooCommerce block-based checkout.
All payment methods managed by the plugin are now supported in this mode as well, and it is no longer necessary to disable the block-based checkout.
WooCommerce is a marketplace plugin for wordpress. You can start selling your items in less than 15 minutes, and there are also many plugins to accomplish all your needs.
Fabrick Payment Orchestra develops and distributes a free plugin for WooCommerce.
Prerequisites
The only prerequisite is that you already know how to use Wordpress and WooCommerce, as a user. You won’t need coding skills to use the plugin.
To simplify the configuration, use a Wordpress instance deployed on a public server. Using it on a local server might be difficult since Fabrick Payment Orchestra might not be able to access your machine from outside.
How to install
Download the zip file and save to a known location on your hard drive.
In Wordpress, Plugins > Add New; search for Gestpay for WooCommerce and click install now.
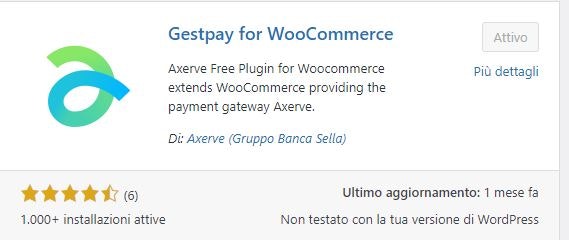
Don’t forget to Activate the plugin.
If you want to manual install the plugin, you can find it in the Wordpress Plugin Repository.
Configure Gestpay for WooCommerce
Once installed and activated, you’ll can go to WooCommerce > Settings and click on Gestpay for WooCommerce tab to configure the plugin.
There are four operational modes in this plugin, selectable by the Account Version dropdown. Which one to use depends on Fabrick Payment Orchestra version you are using:
Starter
Professional
Professional On Site
Professional iFrame
The plugin also supports Subscriptions.
Starter
Gestpay Starter is the easiest version of the plugin. By using this, your buyer will be redirected to Fabrick Payment Orchestra payment page. After the payment, the user is redirected again on your website.
Here we will describe the configuration options.
Fabrick Shop Login
The unique Fabrick Payment Orchestra identifier. You can also use a test shop login (see below). Here you can insert either the TEST shopLogin (starting with GESPAYXXXXX) or the production shop login, that consists of only numbers (example: If your login code to the Merchant Back-Office is XX912345, you should use only 912345).
IP Address
The plugin will detect the server public IP. Use this IP to configure Fabrick Payment Orchestra.
Sandbox mode
Check if you want to redirect your payments to the test environment, where you can test the payment process without real credit card numbers and money.
Debug log
Check if you want to save a log of the data sent to Fabrick Payment Orchestra. Useful for testing and for bug reporting.
Force response verification
In case of problems with order status updates, check this option. The Fabrick Payment Orchestra response will be forcely verified.
Professional
With Professional you can further customize the way Fabrick Payment Orchestra interacts with your users. Your buyers will still be redirected to Fabrick Payment Orchestra payment page for credit card payments, but you can also configure Fabrick Payment Orchestra to work with alternative payment methods (like PayPal), so that your users can choose the payment method they prefer.
You can choose to send to Fabrick Payment Orchestra the buyer e-mail and name, a language parameter, and even some custom parameters.
Besides the options already described for Fabrick Payment Orchestra Starter, here’s a description for Fabrick Payment Orchestra Professional settings:
Buyer e-mail
Check if you wish to send to Fabrick Payment Orchestra the buyer’s e-mail.
Buyer name
Check if you wish to send to Fabrick Payment Orchestra the buyer’s name.
Language
Checking this option you can change the language of the payment page.
The languages available in Fabrick Payment Orchestra are italian, english, french, german and spanish.
To use this functionality you have to enable a multilingual plugin: GestFabrick Payment Orchestrapay for WooCommerce is compatible with qTranslate-X and with WPML
.
If you prefer to replicate the same website in many languages, you can define the constant WPLANG in wp-config.php, for example define ('WPLANG', 'it\_IT');.
Custom info
Here you can insert custom data in the form of parameter=value, one per row. The following characters, together with the space character, are not admitted: & § ( ) \* , ; : \*P1\* / /\* [] ? = % ~. Remember to enable the custom parameter in the Merchant Back-Office.
Payment Types
Check if you want to redirect your users directly to a specific payment method.
Alternative Payments
Here you can enable other systems, like PayPal, Sella Personal Credit, etc.
Professional On Site
Professional On Site allows the user to pay directly from your website, without redirects. On page /checkout the user will be able to insert, along with the shipping address, his payment details.
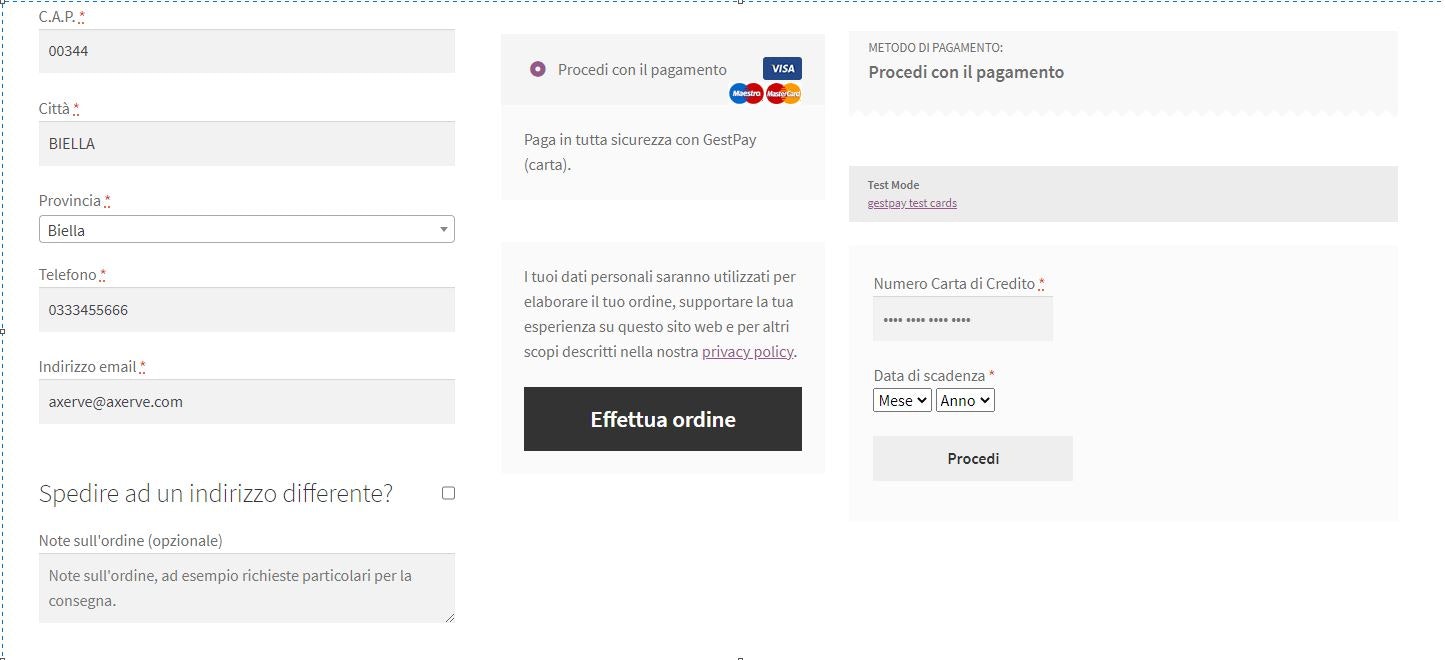
With Professional On Site you can also memorize a masked version of the credit card that you can later use to simplify the shopping process, or to enable subscriptions (see the subscriptions paragraph).
Professional On Site adds some new parameters to the settings page, besides the ones already described for Starter and Professional.
Store Tokens
if enabled, a token is requested to Fabrick Payment Orchestra and stored in the database. With tokens you can enable recurrent payments; a logged user can also pay without inserting credit card data.
CVV
Send the CVV field to Fabrick Payment Orchestra, when requesting a Token. Note: the field must be set as input in the Merchant Back office, otherwise you’ll receive an error.
3D Secure
if checked, the 3D Secure must is enabled for this shop (default).
3D Secure is a security protocol. If the card supports 3D Secure, the user is temporarly redirected on the cardholder website to enter a personal code. This guarantees that the transaction is non disputable; However, for subscriptions or automatic payments this feature must be disabled (ask the customer care for this), otherwise the payments will fail.
Professional iFrame
Professional iFrame is very similar to Professional On site; however, after the checkout phase the user is redirected to checkout/order-pay/:id/, where :id is the order number.
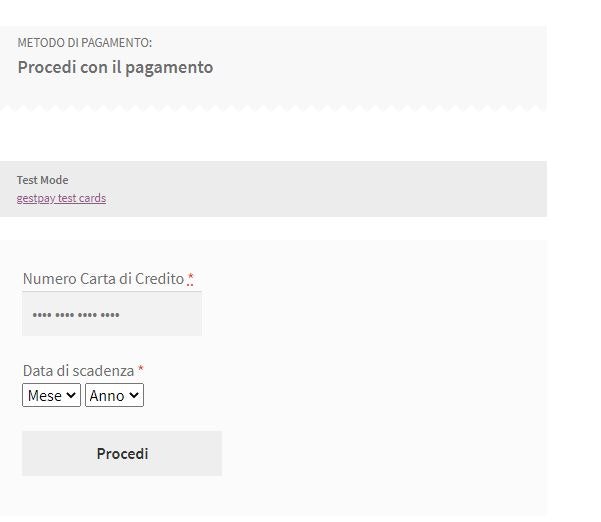
Aviable settings are the same of the previous versions. The differences are that with iFrame version the buyer cannot choose his tokenized credit card; however, the site can still sell subscriptions and recurring payments using this method.
Subscription
Fabrick Payment Orchestra for WooCommerce supports subscriptions and recurrent payments, by using the WooCommerce Subscriptions plugin (not included).
To start, create a subscription product in your shop. To do this, setup the pricing as this:
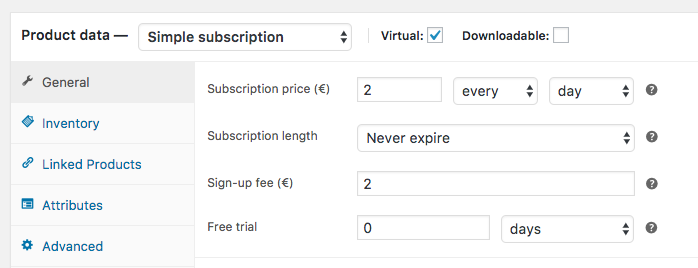
In WooCommerce Subscriptions documentation you will find detailed tutorials and guides to setup a subscription product.
Your products will show like this (your theme might change the graphics):

To enable recurring payments:
You must choose one of Professional iFrame or On-Site.
Store Tokens checkbox must be selected
3D Secure checkbox must not be selected. If 3D secure is enabled, the payment will block waiting for the user PIN. Contact Fabrick customer support to disable 3D Secure verification.
Once the payment is performed, you’ll see the recurring payments in WooCommerce -> Orders page:

To test subscriptions, please refer to WooCommerce Subscriptions docs.
Be aware that a recurrent transaction can fail, for example if the card is elapsed or if the aviable amount on the card is negative; when this occours, the subscription stops and the buyer must pay manually from his account page. To automatically retry failed payments, you can choose the option Retry Failed Payments from WooCommerce Subscriptions.
For more details about failed payments, checkout this page.
Deactivating subscriptions on WooCommerce
Beside the deactivation of the module, it is necessary to clean the tail of the pending subscriptions. Fabrick plugin engages with the Subscriptions functionalities and in case of scheduled actions, it makes a call on the planned date anyway. Therefore, it is necessary to check and, if needed, manually cancel the still active scheduled actions.
To complete the deactivation it is necessary to follow the operations indicated at this link: https://docs.woocommerce.com/document/subscriptions/disabling-subscriptions/
Refund - Settle - Delete
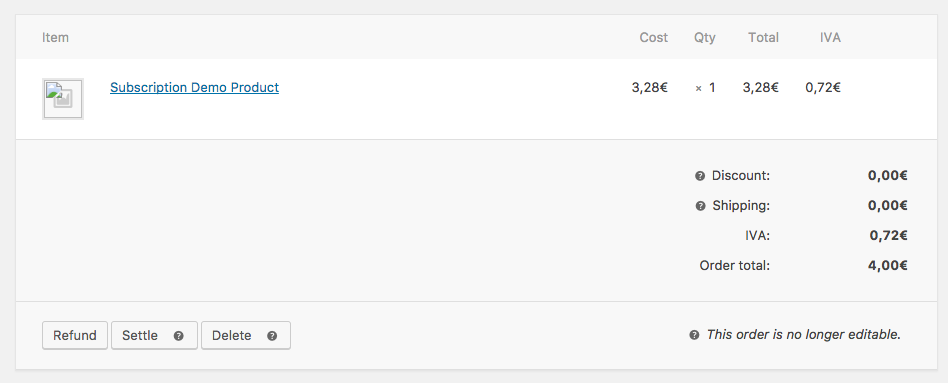
By clicking on the order number you the order details, plus a section with three buttons Refund, Settle, Delete (left bottom): their actions depend on your M.O.T.O. configuration. Let’s see this in action.
Refund : When a transaction is already settled, you can refund it partially or totally by clicking this button. Clicking on it will show you a box like the following:
The button Refund X,XX€ manually is a default button and does not perform a real refund: with this button you are telling WooCommerce that you have already performed (or you will perform) a refund from Gestpay Backoffice.
Using Refund X,XX€ via Fabrick Payment Orchestra will perform the refund operation directly, using Fabrick Payment Orchestra APIs.
Settle: if your MOTO configuration is set to separation of the authorization and the transaction process, after an order your transaction is only authorized; by clicking this button, you settle it.
Delete: if your MOTO configuration is set to separation of the authorization and the transaction process, your transaction is authorized but not settled. By clicking this button you delete the authorized transaction.
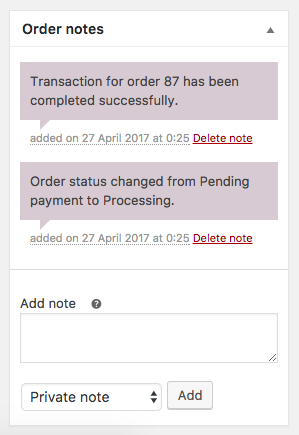
At the right of the page you can also see a log of every action occurred to your transaction. This is extremely useful for debugging and to get a sense of what’s going on.
Activate Gestpay for WooCommerce
Once you have set up your plugin with the Fabrick Payment Orchestra account, move to WooCommerce > Settings and select the Checkout tab.
Here you’ll see the Fabrick Payment Orchestra menu enabled. Depending on the configured alternative payments, you might find other payment methods. For example, in the image below you’ll see Gestpay Pro PayPal.

Clicking on Gestpay, you can:
Enable/disable the payment method
Set a Title and a description (that will be shown to the user on checkout)
Choose the icons that will be shown to the user.
Configuration for custom alternative payments enabled is similar.
Configure the Merchant Back Office
A merchant can configure the Merchant Back Office to receive requests from WooCommerce plugin. There are two environments available:
To request a test account, go to the registration page.
Configure Authentication
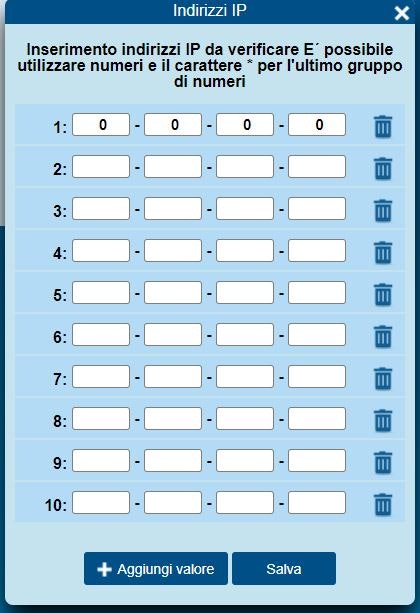
Fabrick Payment Orchestra will identify the merchant by comparing his IP address with the ones that are configured in the Merchant Back-Office. To insert your address or addresses, go to Configuration > Environment and click on IP Address.
Configure redirect addresses
Fabrick Payment Orchestra will notify the transaction status redirecting the browser to pages that are set up by the merchant (for example, success.php o error.php).
In Configuration > Environment click on Response Address and set the relevant data for customer care, fraud prevention, etc.
Then, set the Url for positive answer and the URL for negative answer. If your website address is http://yoursite.com, you have to set http://yoursite.com/?wc-api=WC_Gateway_Gestpay in both fields.
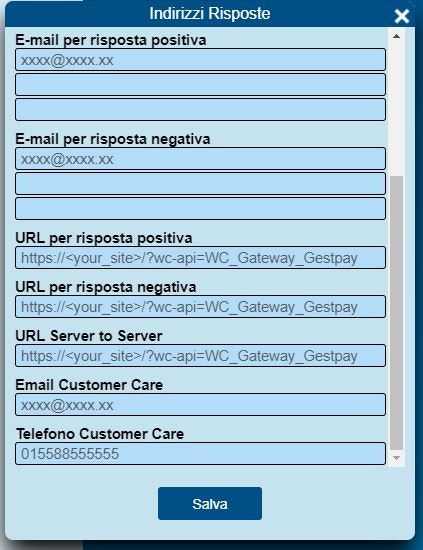
It is very important that ?wc-api=WC_Gateway_Gestpay is appended to your website address. With this code, the plugin will understand that the call is from Fabrick Payment Orchestra and will do decrypt the call. Then, the user is redirected to WooCommerce’s configured Order Received page.
It is important that all the three URLs have that string appended.
LOG files
There are two ways to reach the plugin logs:
Woocommerce > Stato > Log and selecting the Gestpay log related to the interested day, e.g.: gestpay-for-woocommerce-2021-03-02-137cd59a529d112ba849c25a34b429fc.log (2 Marzo 2021 alle 16:17)
Alternatively, it is possible to access the file from path-di-base-del-sito/wp-content/uploads/wc-logs/ within which all the logs are identified by “gestpay-for-woocommerce-2021-ecc…”
For further information, a guide on how to activate logs in WooCommerce is available. https://pagely.com/blog/wordpress-logs-track-errors-guide/
Functionality
iFRAME
iFrame
Card saving and token use
Tokenization
Authorisation S2S
Enable TOKEN, TOKENEXPMONTH e TOKENEXPYEAR fields in “Fields & Parameters” section of Backoffice
Settle payments
Cancel and settle S2S
Cancel payments
Cancel and settle S2S
Refund
Refund S2S
MyBank on mobile divices
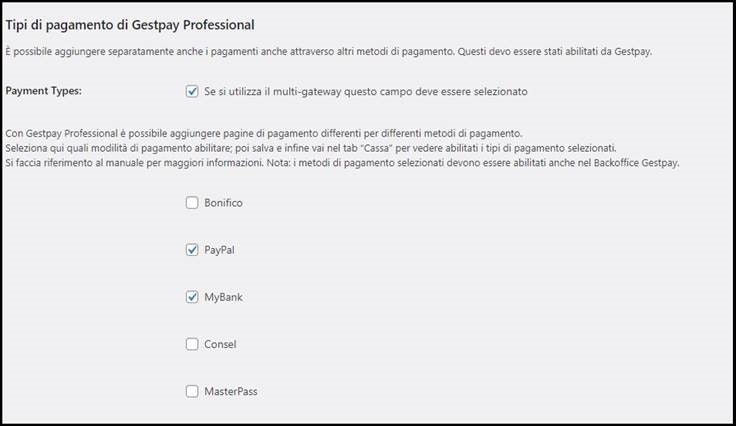
To use MyBank on mobile devices, activate the method in the control panel:
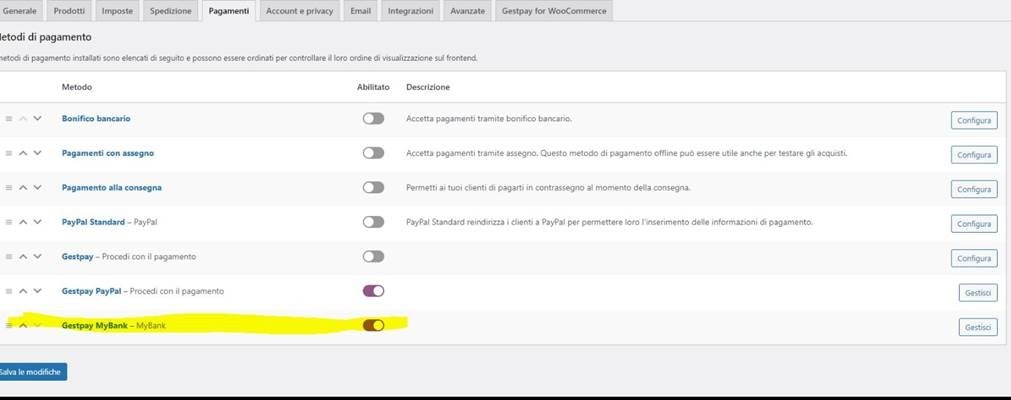
Then enable the payment component in the “payments” tab:
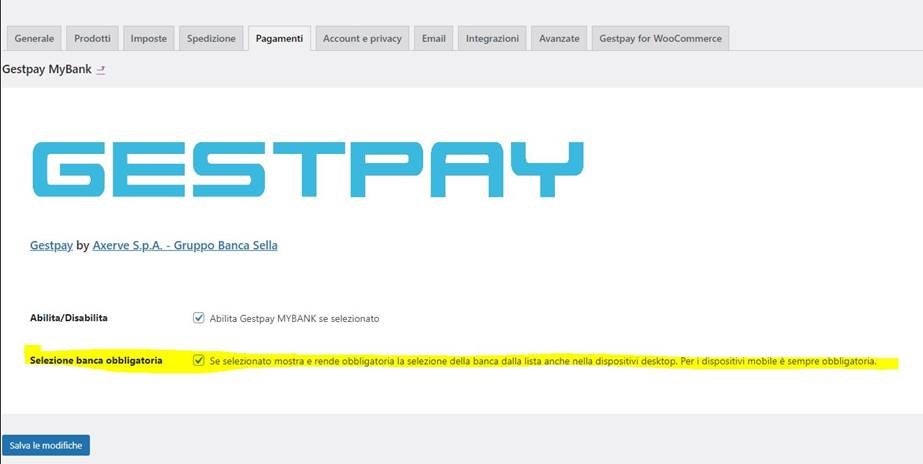
And then check the ”Mandatory bank selection” field:
In the checkout page, the option to select your desired bank will now be visible:
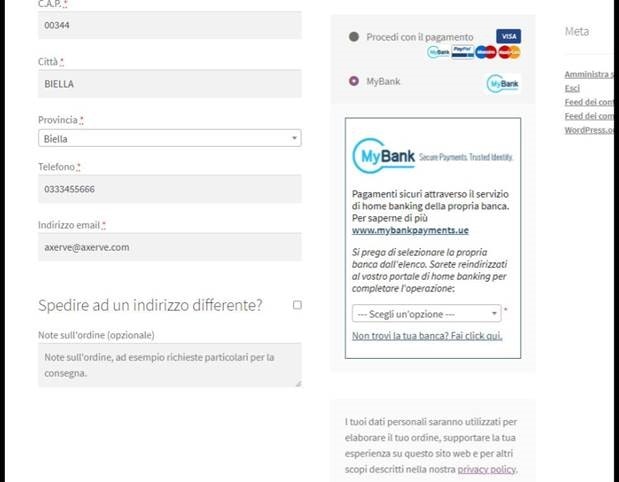
This option works with the three contract options (Professional, On-Site and iFrame).