Salesforce
 S2S SOAPTokenization3DS2 – Authentication Fabrick Guaranteed payments Fabrick Guaranteed payments - AdviceRBA (Risk-Based Authentication)PayPal Seller Protection
 Payment methods available
 Payment methods available


Merchants who want to use Fabrick Payment Orchestra within their products must first register and create an account with Fabrick Payment Orchestra.
The integration of Fabrick Payment Orchestra on Salesforce Commerce Cloud is offered as a generic cartridge and allows you to use different payment methods.
Functionality
Below is a list of the features available to merchants using Fabrick Payment Orchestra on Salesforce Commerce Cloud:
ability to enable the Fabrick Payment Orchestra payment processor for credit card payments
ability to set up two types of access to Fabrick Payment Orchestra on Salesforce Commerce Cloud: token generation via iFrame or using tokens via S2S
the Fabrick Payment Orchestra cartridge can be set to test mode so that all payments are transferred to the Fabrick Payment Orchestra test environment and have no impact on cash transactions
ability to set the payment method on Fabrick Payment Orchestra iFrame in order to customise the appearance of the credit card payment form
ability to set the payment method on Fabrick Payment Orchestra Server-to-Server (S2S), allowing the developer to use the functionality of Fabrick Payment Orchestra Server-to-Server
ability to enable or disable the function of saving the buyer’s credit card for the next purchase
ability to individually enable the payment methods described above.
ability to enable fraud protection using Fabrick Guaranteed payments.
Merchants wishing to enable these payment methods should contact the sales representative or technical assistance to get information about the availability of the implementations or the necessary configurations. The basic cartridge, in fact, is compatible with all country and currency (Local): for example, the credit card is compatible with all configurations but there may be configuration logic specific to each payment method. You can deepen all the specific information on the integration of payment methods from the dedicated page.
Web services
The Fabrick Payment Orchestra cartridge interacts with two web services:
WSCryptDecrypt, a service that provides two functions:
Encrypt: encrypts the payment data so that no one can tamper with it. The result of this operation is used to enable the payment in iFrame;
Decrypt: at the end of the payment process, Fabrick Payment Orchestra sends an encrypted response to the host. Then, the host decrypts the data to retrieve the payment status. The response may also contain a token-type string, i.e. a representation of the credit card that is only valid for the Fabrick Payment Orchestra Shop Login used;
WsS2S: a service used for Server-to-Server which provides the following functions:
CallPagamS2S: with this call, the user can pay with either credit card data or a token retrieved via Decrypt;
CallCheckCartaS2S: checks the validity of the card;
CallDeleteS2S: deletes an authorised transaction;
CallDeleteTokenS2S: deletes a token related to a saved credit card;
CallIdealListS2S: returns the list of banks participating in IDeal;
CallMyBankListS2S: returns the list of banks participating in MyBank;
CallReadTrxS2S: returns the history and status of transactions;
CallRefundS2S: performs a partial or full refund of the transaction amount;
CallSettleS2S: financial confirmation which may follow a positive authorisation;
CallUpdateOrderS2S: merchants can use this as a way to update order values for the fraud protection system;
CallUpdateTokenS2S: merchants can use this as a way to update the expiry date of a token;
CallVerifycardS2S: merchants can use this as a way to verify the credit card.
REST:
POST PaymentDetailService, a service used during Server-to-Server operations to retrieve payment information relating to an order.
Fabrick Payment Orchestra Backoffice merchant configuration
The documentation for creating a merchant account can be found here.
Configuration
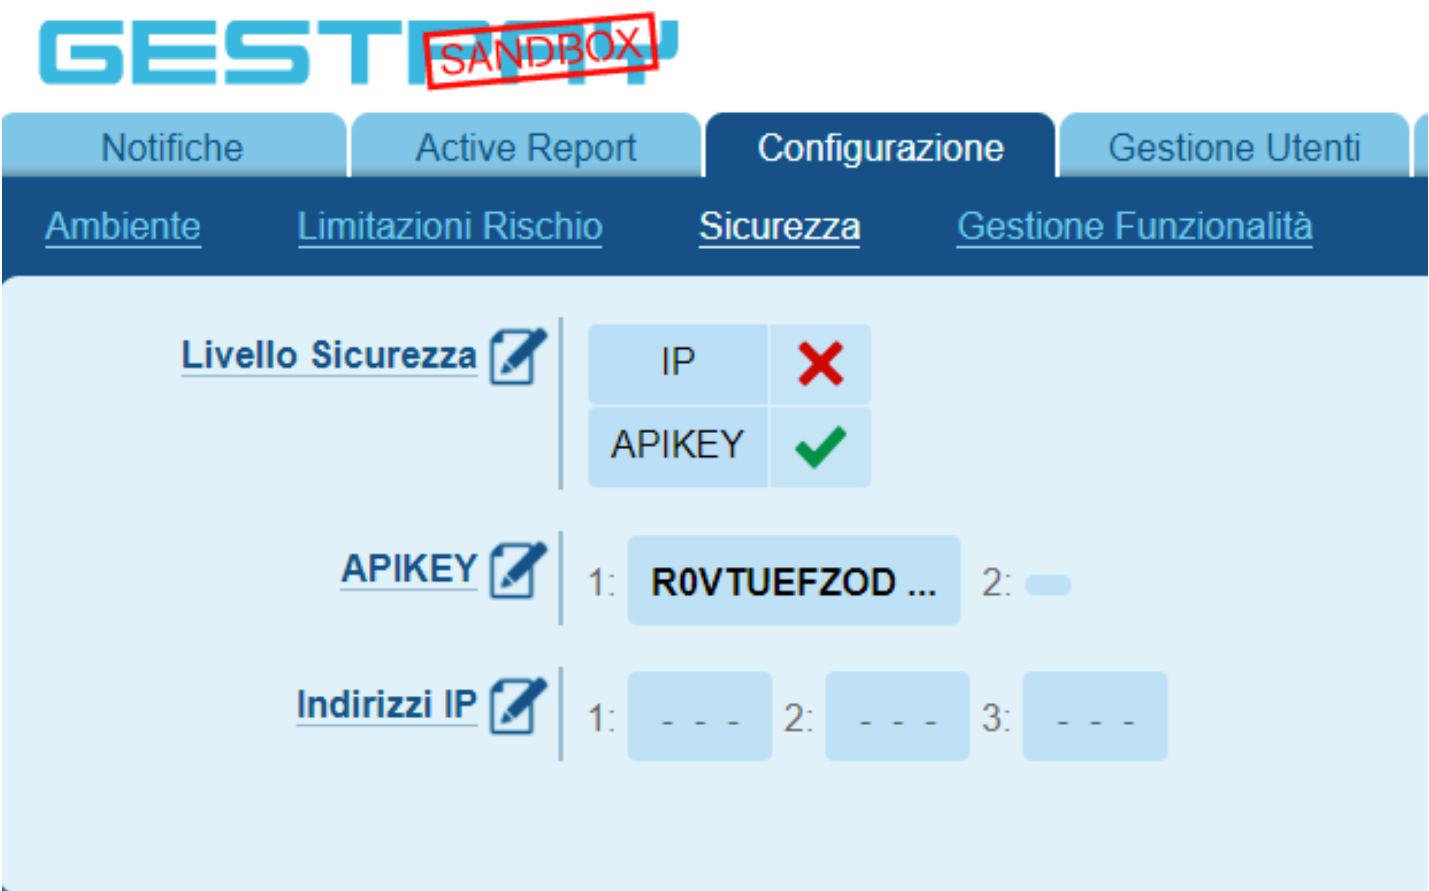
Under Configuration > Security you can create the API to enable communication between the Salesforce Commerce Cloud sandbox and the Fabrick Payment Orchestra Backoffice.
It is not necessary to activate the IP security level, since by activating the API Key it is possible to use this connection mode in the different applications (sandbox SFCC test, development, staging).


In the Configuration > Environment section, fields are available to specify the URLs to which the customer sould be redirected depending on the payment outcome:
URL for positive responses: Fabrick directs users to this URL after processing the payment if the outcome is positive
URL for negative responses: Fabrick redirects users to this URL after processing the payment if the outcome is negative
Server-to-server URL: server-to-server call, this response is sent in both cases (positive and negative)
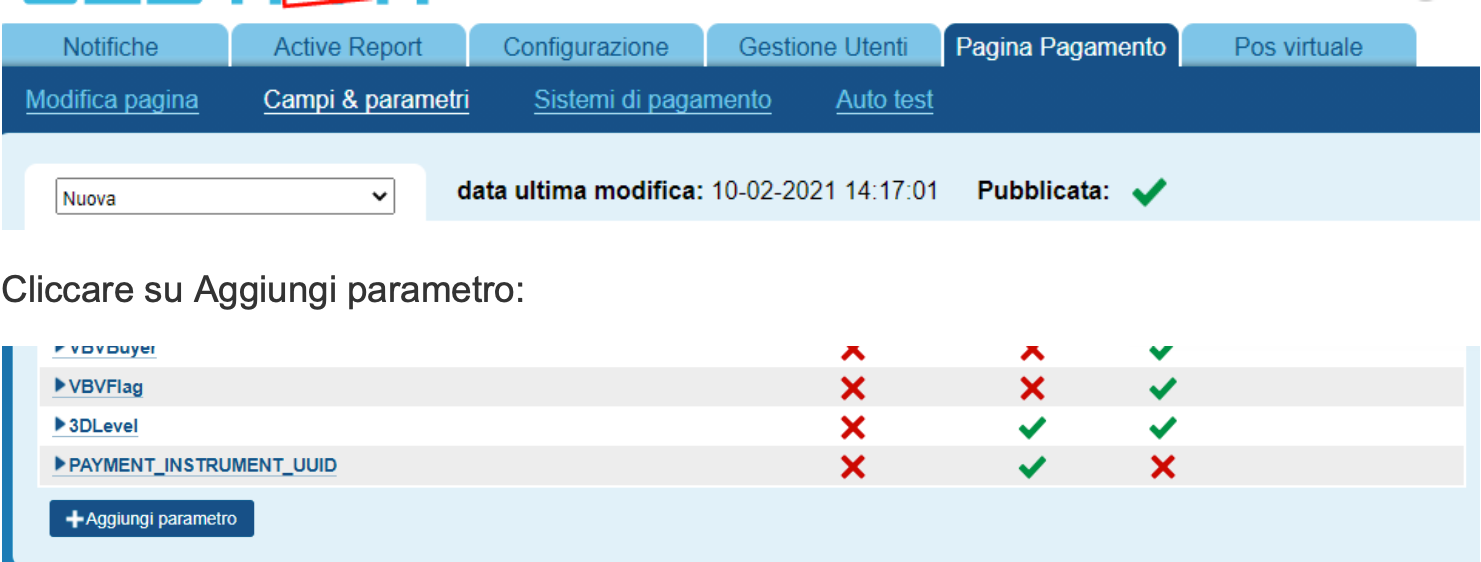
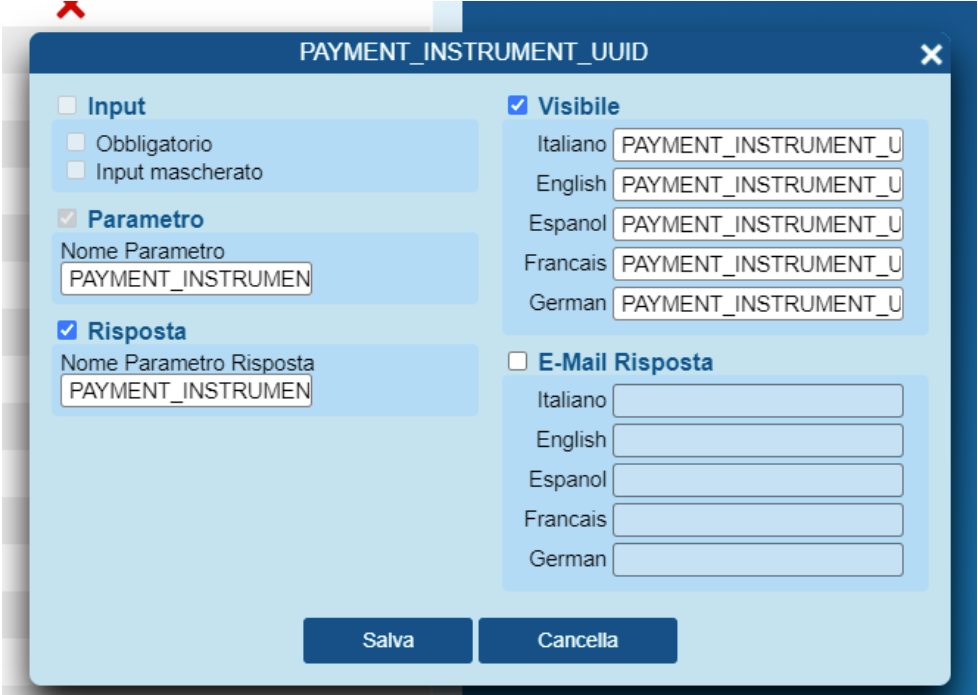
After completing the previous steps, it is necessary to go to Payment Page > Fields¶meters section and enter your custom parameter PAYMENT_INSTRUMENT_UUID.
This parameter is needed to identify the payment method used and associate it with the relevant order, since a single Salesforce order could be paid for using several payment methods (credit card, PayPal, discounts, etc.).
Click on Add parameter:


You will see the following screen:


It will then be necessary to enable these parameters: TOKEN, Token ExpiryMonth and Token ExpiryYear and ORDER_TOKN


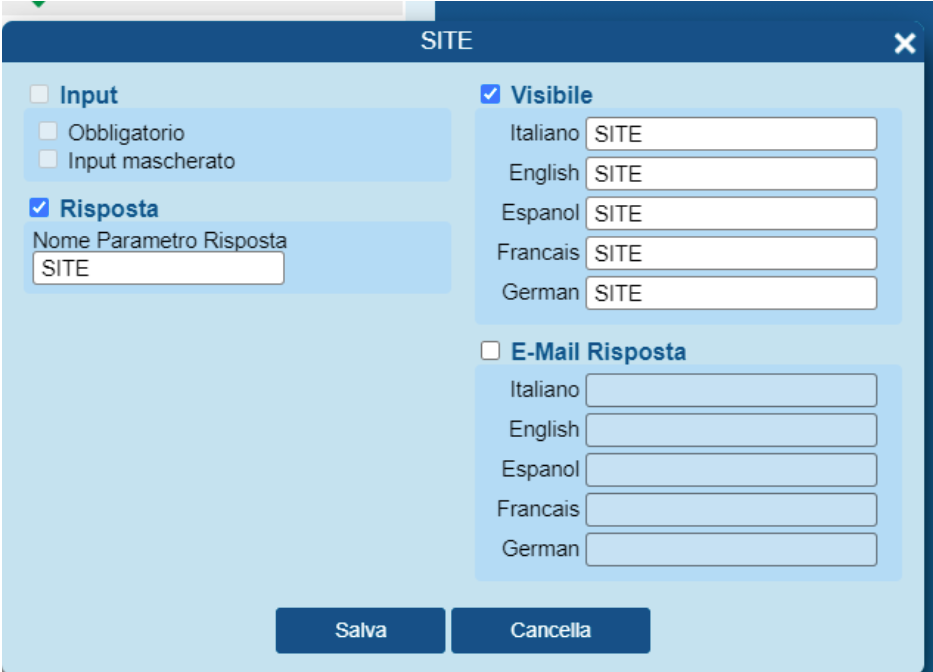
Another custom parameter that must be added is the SITE parameter, as below.


A parameter that must be added is LOCALE:


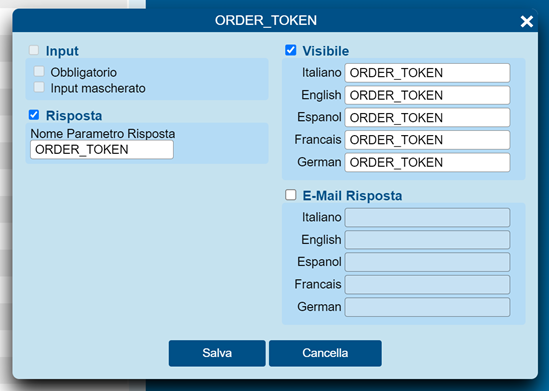
Last parameter to add is ORDER_TOKEN:


Cartridge Installation Guide
Installation from Zip file and update
Extract the contents of the file link_gestpay_24.1.1.zip  or latest version and copy the folder link_gestpay_24.1.1 (renamed as link_gestpay in the following paragraphs) into the project root.
If you update the cartridge version, you must import all services and payment methods and repeat the compilation steps. (Read the guide again for any updates or changes on alternative payment method configurations).


Front-end compilation
In order to use the Fabrick Payment Orchestra cartridge, it is necessary to install NodeJS 8+ on your device. The cartridge works independently and does not require anything else.
After copying the link_gestpay folder into the project root, open the terminal in the link_gestpay folder and run the npm install command. Once the above is complete, build the cartridge using the npm run compile:js command. The Fabrick Payment Orchestra cartridge does not contain any CSS files, so JS compilation is sufficient.
The front-end compilation has been corrected and optimised in the transition from version 5.1.6 to 5.1.7 in order to provide system integrators with a complete cartridge that runs in stand-alone mode. The previous version, on the other hand, required the inclusion of custom logic to carry out the compilation (adding custom files to the Fabrick Payment Orchestra cartridge or using other cartridges in the project in order to set points to the underlying cartridges and carry out the JS compilation steps).
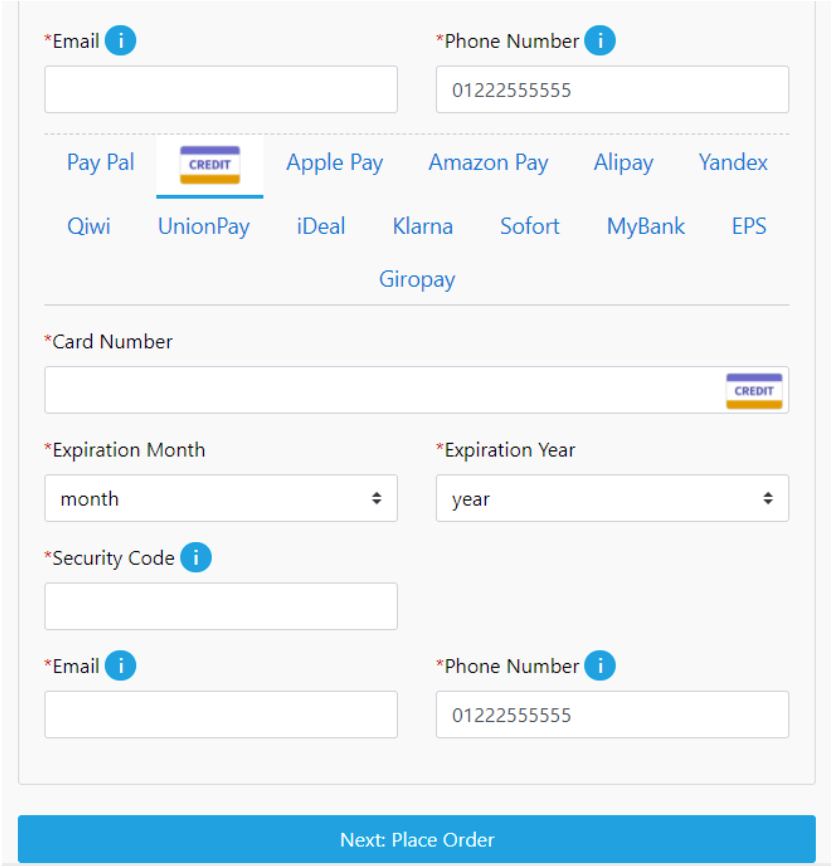
Once installation has been completed via the next steps, the expected result on the front end should be as follows:


Cartridge path configuration
In Business Manager, go to Administration > Sites > Manage sites > siteID > Settings and add the following cartridges to the beginning of the cartridge path: int_gestpay_mfra:int_gestpay:int_gestpay_core
Cartridges must be uploaded using the standard procedures provided by Salesforce Commerce Cloud: via the Commerce Cloud UX-Studio plugin on Eclipse or via the dw.json configuration file and the Prophet Debugger extension for Visual Studio Code.
In case you want to enable payment via Apple Pay, the plugin_applepay cartridge needs to be installed. You can download it here.
After installing the plugin_applepay cartridge in the project, it needs to be called in the cartridge path using the following syntax and position:
plugin_applepay:app_storefront_base
Here is an example of a complete cartridge path, with a custom cartridge in addition to Fabrick Payment Orchestra, Apple Pay and SFRA:
app_custom_mybrand:int_gestpay_mfra:int_gestpay:int_gestpay_core:plugin_applepay:app_storefront_base
Import Metadata
In the link_gestpay/metadata folder there is a folder called meta-mfra that contains two .xml files (custom-objecttype-definitions.xml, system-objecttype-extensions.xml) that need to be imported under Administration > Site Development > Import & Export.
All .xml import procedures described in the document need to be carried out in MERGE mode.
Before importing .xml files, we advise exporting the metadata already on your Business Manager application (Meta Data > Export, export custom object type and system object type separately) and merge them with the .xml files in the link_gestpay cartridge, then upload the updated files.
Configuring and activating payment methods
In the link_gestpay/metadata folder, there is an .xml file called payment-methods.xml which must be imported under Merchant Tools > Ordering > Import & Export > Payment Methods.
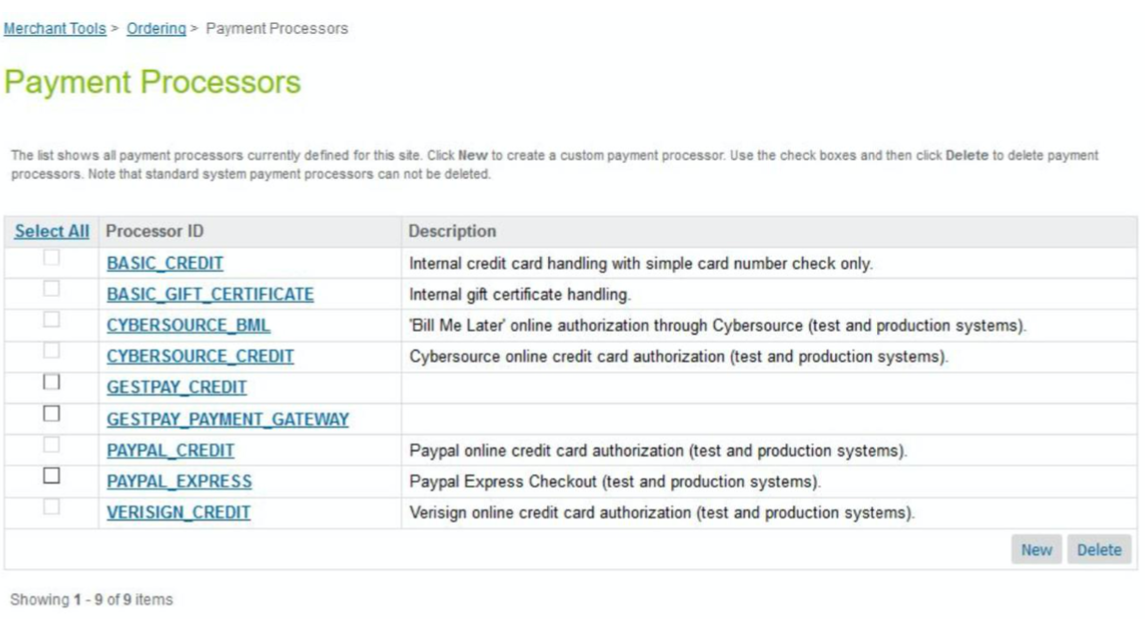
Payment Processors can be configured manually by adding the new GESTPAY_CREDIT and GESTPAY_PAYMENT_GATEWAY components in the Merchant Tools > Ordering > Payment Processors section or by importing the payment-processors.xml file via the Administration > Site Development > Site Import & Export section. For manual creation, you must enter GESTPAY_CREDIT and GESTPAY_PAYMENT_GATEWAY in the ID field, while the description field can be left empty.


Credit card
To enable credit card payments, go to Merchant Tools > Ordering > Payment Methods and select CREDIT_CARD. Set up the Payment Processor on GESTPAY_CREDIT and verify that the Enabled field is set to “Yes”.


Apple Pay
Creating a certificate for Gestpay
Enter the Gestpay Back Office and go to Configuration > Environment > Payment Methods.
Select Apple Pay and click on “Download CSR”, as shown here:


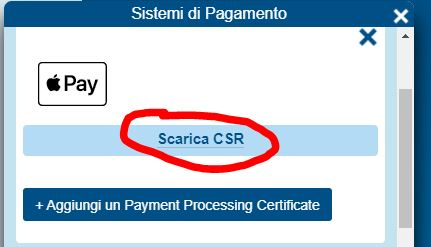
The file will be downloaded in the format CodieEsercent_DataDownload.certSigningRequest
Log into your Apple account and go to section “Certificates, Identifiers & Profiles”. After creating a Merchant ID (in case you haven’t already), enter editing mode to see the following:


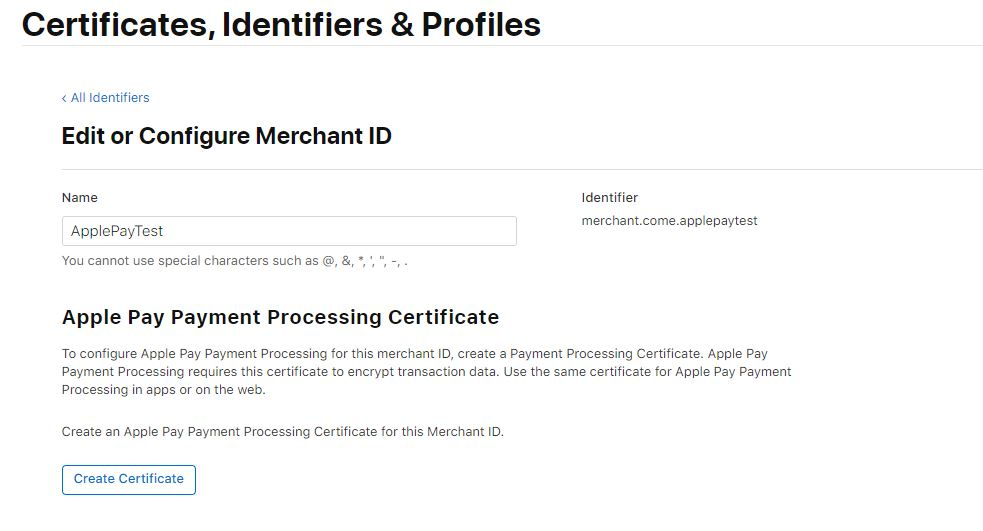
Click on “Create Certificate” to open the folowing page:


Click on “Choose File” and select the CSR file produced by Gestpay. A Payment Processing Certificate will be created, which can be downloaded from this page:


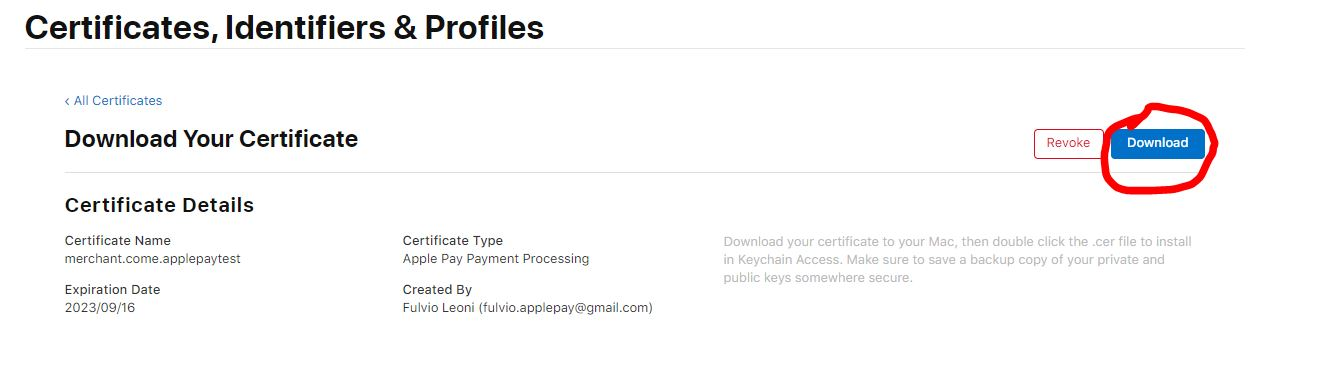
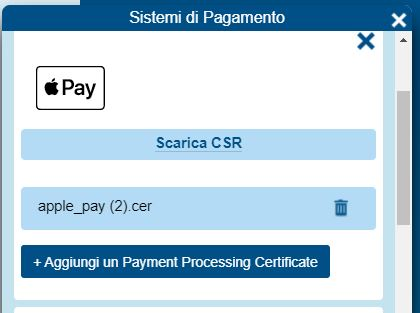
The file will have the format CertificateName.cer, and needs to be uploaded to Gestpay by pressing the button shown in the following image:

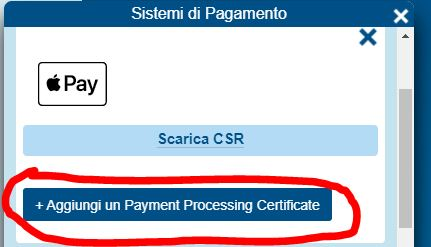
Once correctly uploaded, the file will be shown here:


Enabling Apple Pay
To enable payments via Apple Pay on devices that supports it, access section Merchant Tools > Ordering > Payment Methods and select DW_APPLE_PAY. Set the Payment Processor to “NONE” and verify that the Enabled field is set to “Yes”.
Important: Compared to other payment methods, Apple Pay requires extra configurations and the installation of cartridge plugin_applepay, downloadable here.
After installing the plugin_applepay cartridge in the project, it needs to be called in the cartridge path using the following syntax and position:
plugin_applepay:app_storefront_base
Here is an example of a complete cartridge path, with a custom cartridge in addition to Fabrick Payment Orchestra, Apple Pay and SFRA:
app_custom_mybrand:int_gestpay_mfra:int_gestpay:int_gestpay_core:plugin_applepay:app_storefront_base
To configure Apple Pay, you need to set some values in the custom preferences, found in section Merchant Tools > Site Preferences > Custom Site Preference Groups > Apple Pay, according to Saleforce’s official documentation: Configure Apple Pay on the Web in Business Manager.


Once these steps are completed, the custom preferences GestPayEnableApplePayCart and GestPayEnableApplePayPDP need to be enabled.


These preferences will enable two modes of purchase:
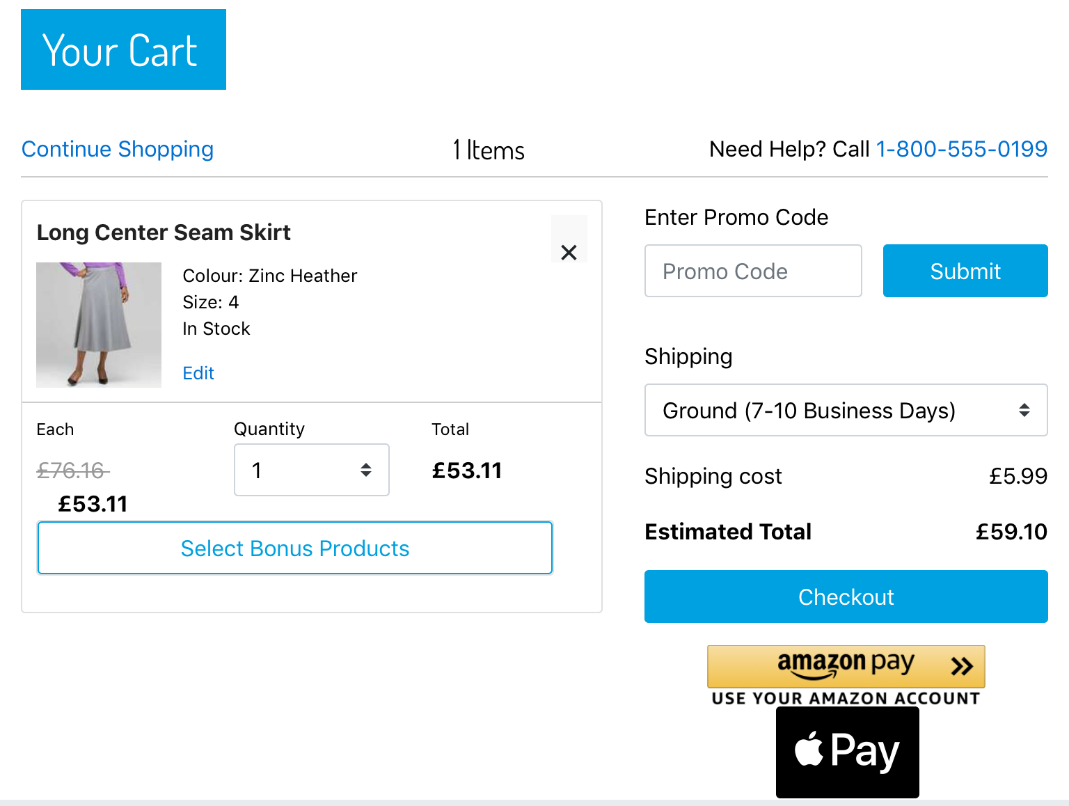
GestPayEnableApplePayCart, which enables the finalization of purchase for every item in the basket by showing the final fields that need to be filled.


Mini Cart:


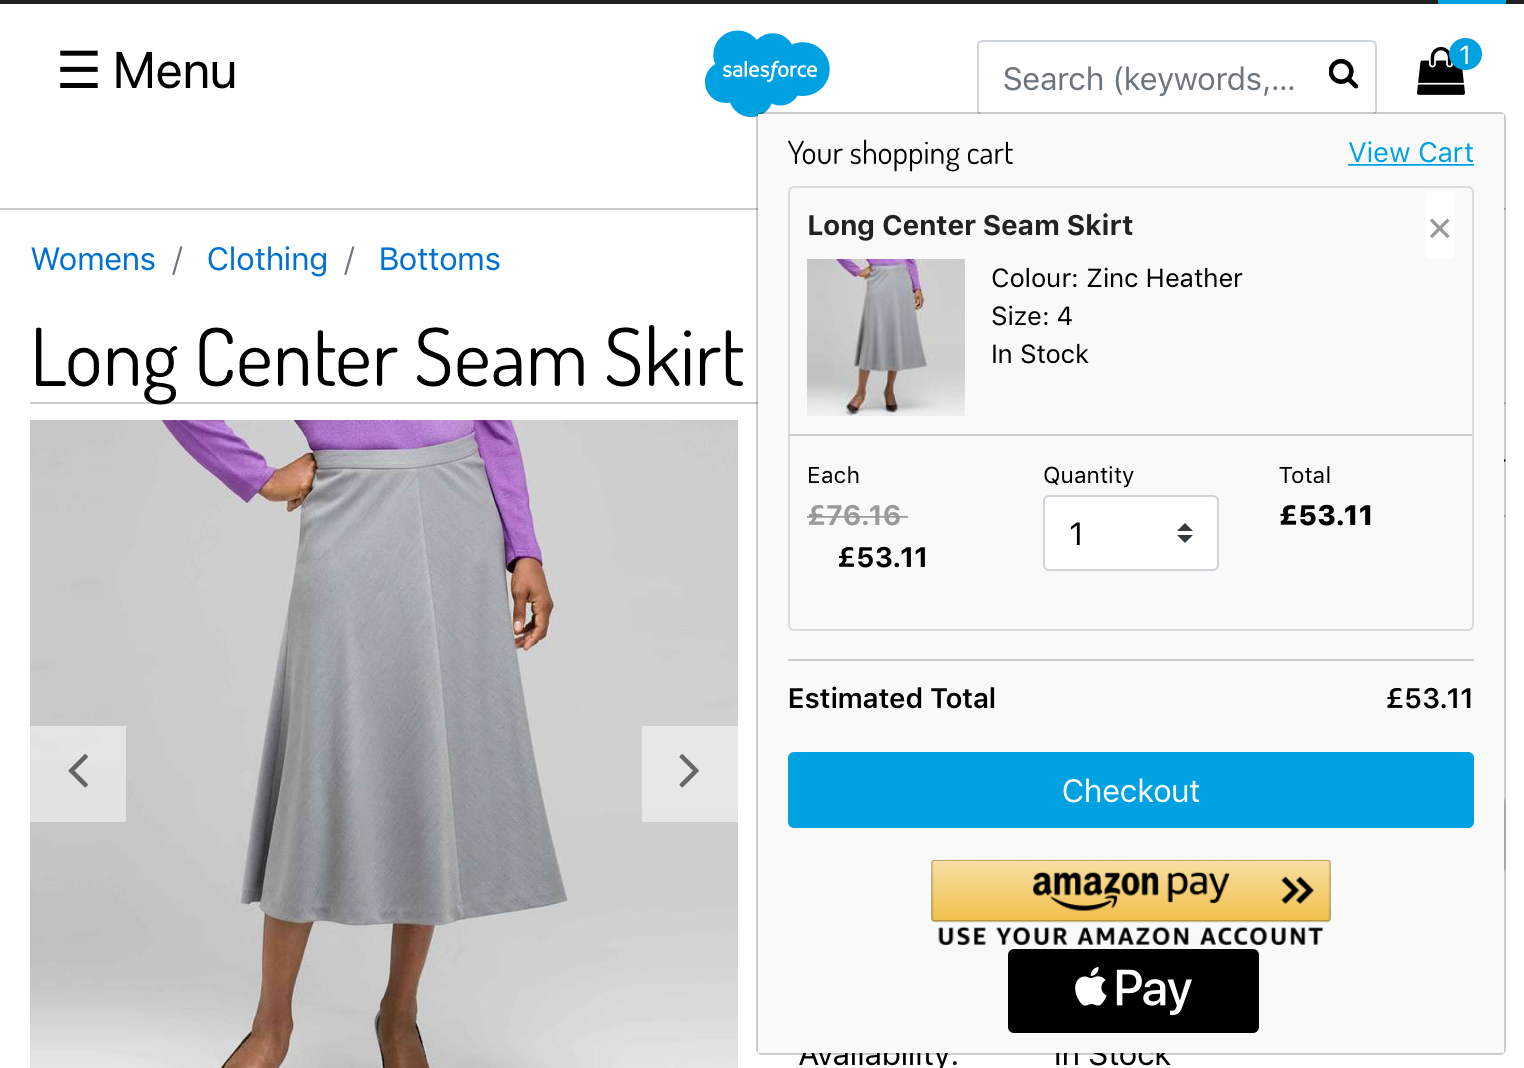
GestPayEnableApplePayPDP, this mode will instead allow direct purchase of one product in its details page, similarly to a “buy now” button. Pdp – Product Detail Page:


If you have already installed the Fabrick Payment Orchestra package with earlier versions, you must import metadata again and follow the guide on this page.
PayPal
To enable PayPal payments, go to Merchant Tools > Ordering > Payment Methods and select PayPal. Rename the ID using PAYPAL instead of PayPal; then set the Payment Processor to GESTPAY_PAYMENT_GATEWAY and check that the Enabled field is set to “Yes”.
To enable Paypal Seller Protection, a custom preference needs to be set in the Merchant Tools > Site Preferences > Custom Site Preference Groups > Gestpay Configuration: GestPayEnableSellerProtection section. Before enabling this functionality, its properties need to be configured correctly in the Paypal and Gestpay platforms. More information.
PayPal Buy Now Pay Later
In order to enable PayPal Buy Now Pay Later Seller Protection, it is necessary to value the dedicated custom preference in the Merchant Tools > Site Preferences > Custom Site Preference Groups > Gestpay Configuration: GestPayEnableSellerProtectionBNPL. Before enabling this functionality, it is necessary to have correctly configured the properties pertaining to this functionality in the PayPal and Gestpay portals.
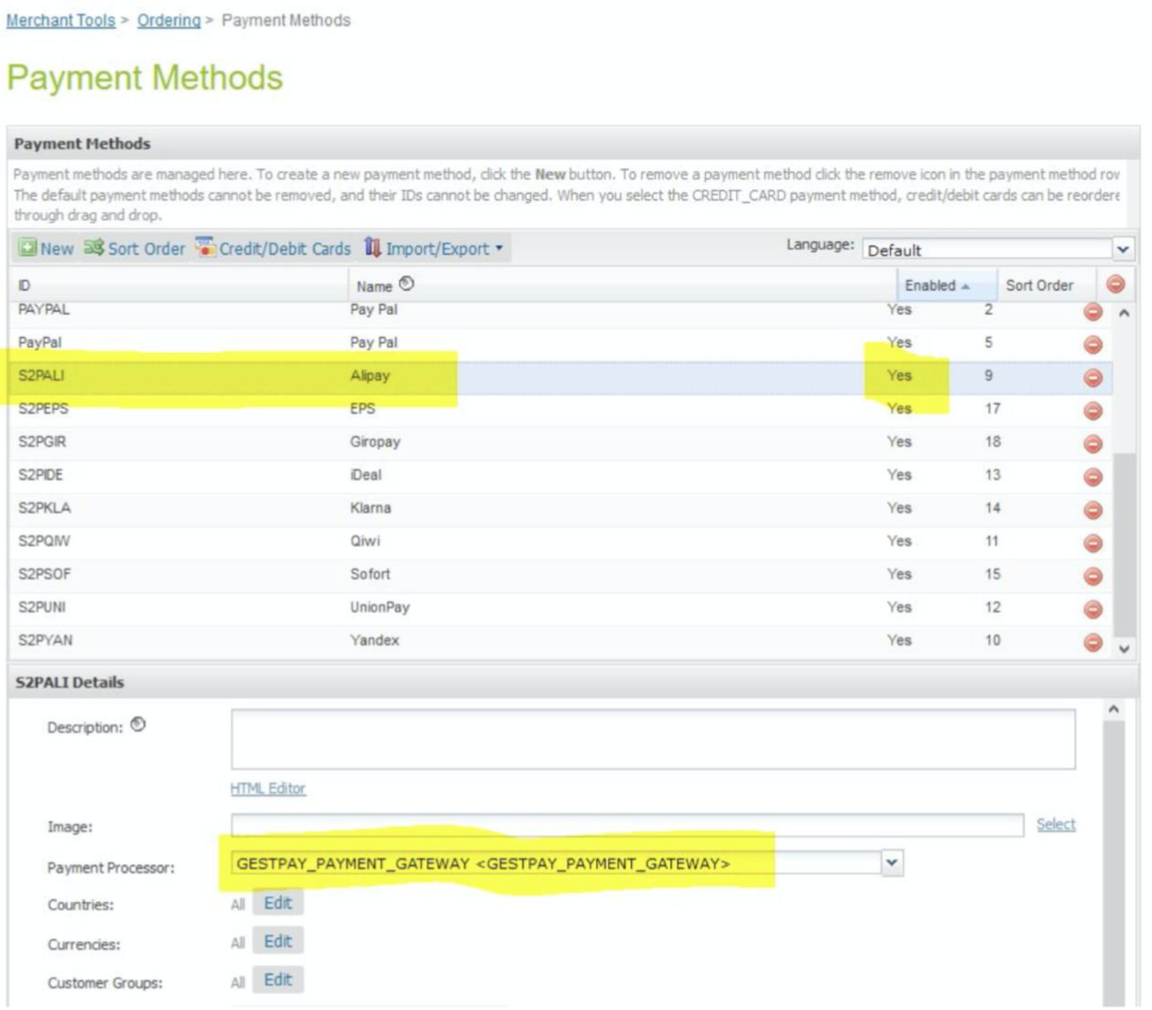
APM Configuration
To enable each of these methods, it is necessary to set the Payment Processor to GESTPAY_PAYMENT_GATEWAY and check that the Enabled field is set to “Yes”.
Below is an example for Alipay:


The list of enabled payment methods must be consistent with the configurations made in Fabrick Payment Orchestra Backoffice.
Site preferences configuration
In the link_gestpay/metadata folder, there is an .xml file called preferences.xml which needs to be imported in the Administration > Site Development > Site Import & Export section.
After importing the file, it is possible to set the Site Preferences for Fabrick Payment Orchestra in the Merchant Tools > Site Preferences > Custom Site Preference Groups > GestPay Configurations section.


Here are some instructions on how to set up the required Site Preferences:
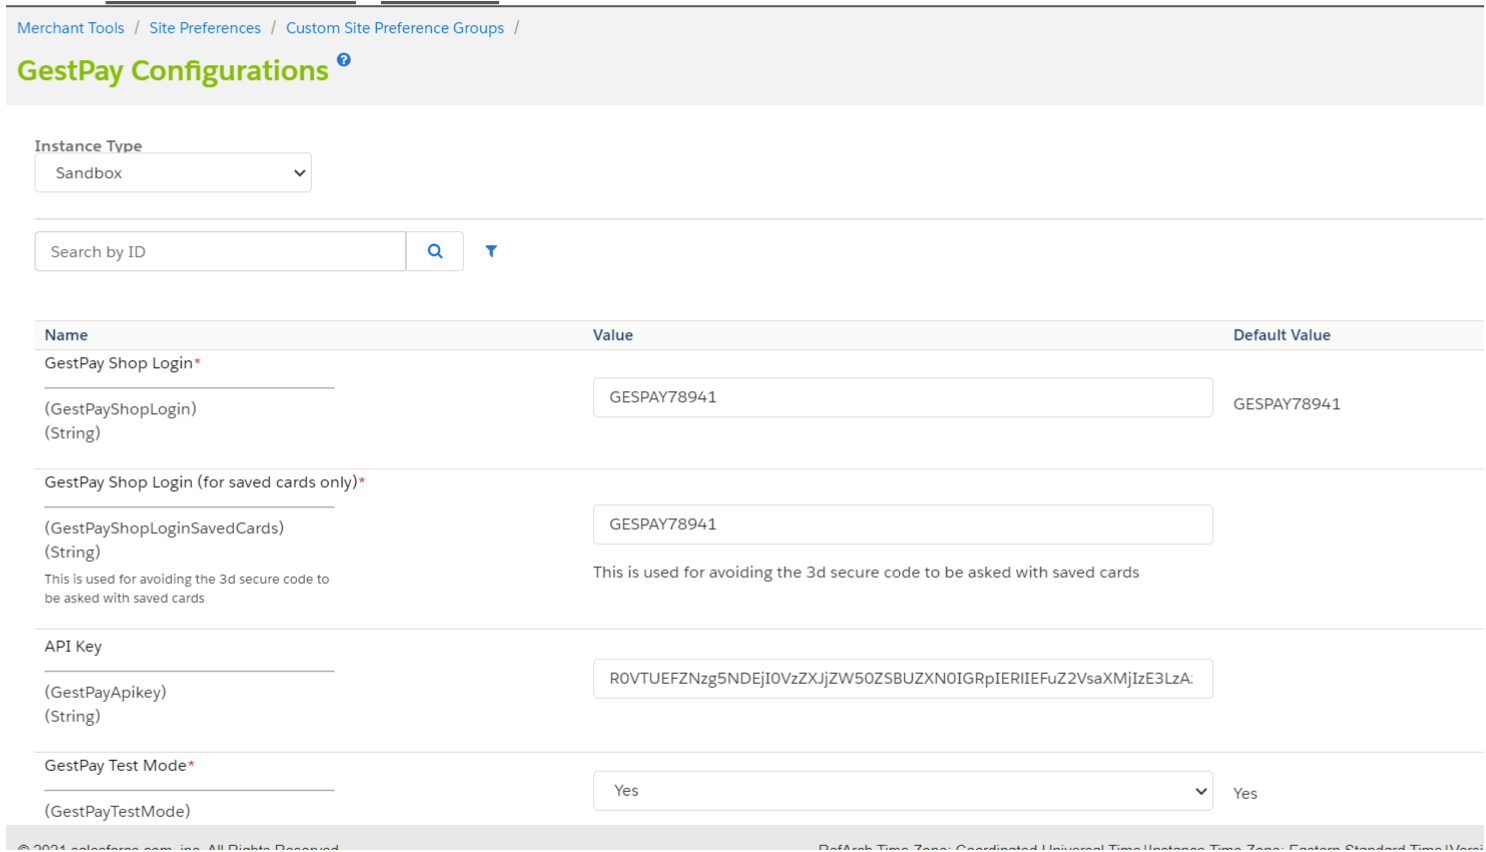
The Fabrick Payment Orchestra Shop Login and Fabrick Payment Orchestra Shop Login (for saved cards only) fields must both be filled in with the Fabrick Payment Orchestra Shop Login data, which can be found in the top right corner of Fabrick Payment Orchestra Backoffice


the API Key field must be filled with the key generated by Fabrick Payment Orchestra Backoffice
the Fabrick Payment Orchestra Test Mode field must be set to Yes during testing
the Fabrick Payment Orchestra Fraud Prevention field must be set to Yes if the Fabrick Guaranteed payments solution is used
the Fabrick Payment Orchestra Payment Mode field is set to iFrame but can also be set to the S2S value.
the GestPay Save Credit Card Token (iFrame mode) field can be enabled for saving cards and requires Tokenization to be enabled.
the Fabrick Payment Orchestra PendingOrderTimeOut field defaults to 24, the value that can be assigned to this field must be between 12-48. This value represents the time limit, in hours, after which the status of a pending order or order with an unconfirmed transaction is updated to FAILED by CheckOrders.
GestpayViewTypeImage, this new custom Preference has the default value set as small, as it corresponds to the view type used by Salesforce in the demo sandbox, for images from the catalogue. Should your customer want/have different viewTypes, you can configure the preferences with the value used in your productLineItemModel.


Configuring Services
In the link_gestpay/metadata folder, there is an .xml file called services.xml which needs to be imported in the Administration > Operations > Site Import & Export section.


Configuring Jobs
In the link_gestpay/metadata folder, there is an .xml file called jobs.xml that needs to be imported under Administration > Operations > Import & Export.
Only one job is imported via this .xml, gestpay-s2s-job, which refers to the file int_gestpay/cartridge/scripts/jobs/notification.js, but this file is not in the official version 5.1.6 of the cartridge or in the previous versions (5.1.5, 5.1.3). The file has been restored to version 5.1.7 using a customised version of the 5.1.6 cartridge, adapted for a specific merchant.
LOG Analysis
Logs are defined at the int_gestpay_mfra level and are contained in the file that handles service calls. The keyword to look for in the logs is gestpayService, which can be found in the SFCC logs. To access the log view on SFCC, go to Administration > Development Setup > Log Files.
Job Installation Guide
Notes
It is necessary to use the job if you are using Klarna as a payment method or if Riskified has been enabled on your merchant account.
Klarna - The order on SFCC will remain in CREATED status until the "CheckOrders" job is executed. Once the job is executed, the order status will be updated to NEW or FAILED, depending on whether the check was successful or unsuccessful. For this method in this case it is necessary to disable GestPayNewKlarna in the custom preferences of the BM, by default the value is configured to true.
Klarna (New integration) - for this method in this case it is necessary to enable GestPayNewKlarna in the custom preferences of the BM, by default the value is configured to true.


We recommend that you set up the CheckOrders job step in your order update job, which we will call UpdateOrders for example, in order to avoid possible competition problems on resources (orders), thus having a single writer on orders.
To install the step in your UpdateOrders you must follow the instructions in paragraph 5.2.2.
In the absence of pre-existing jobs, we recommend starting from paragraph 5.2.1.
Job Step Installation From BM
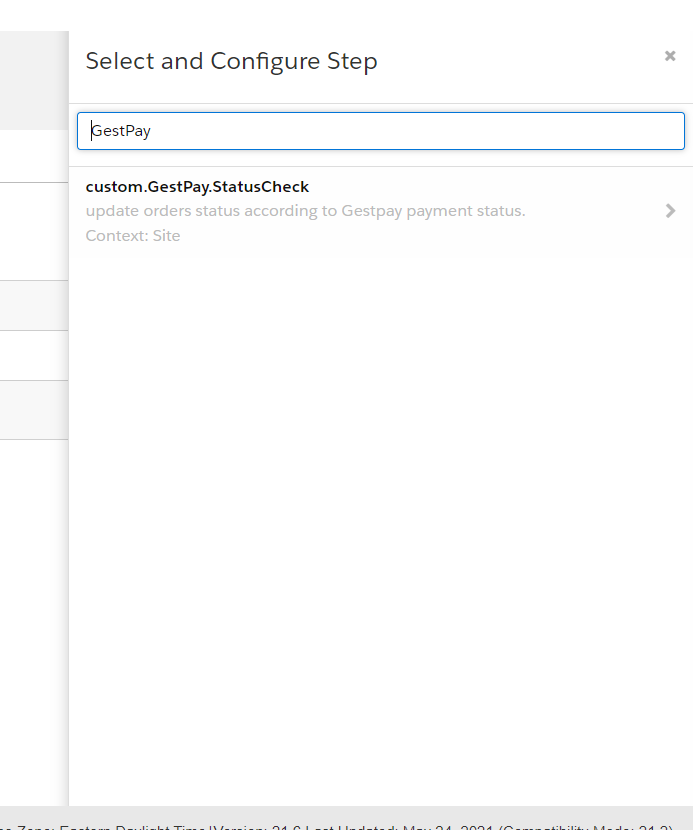
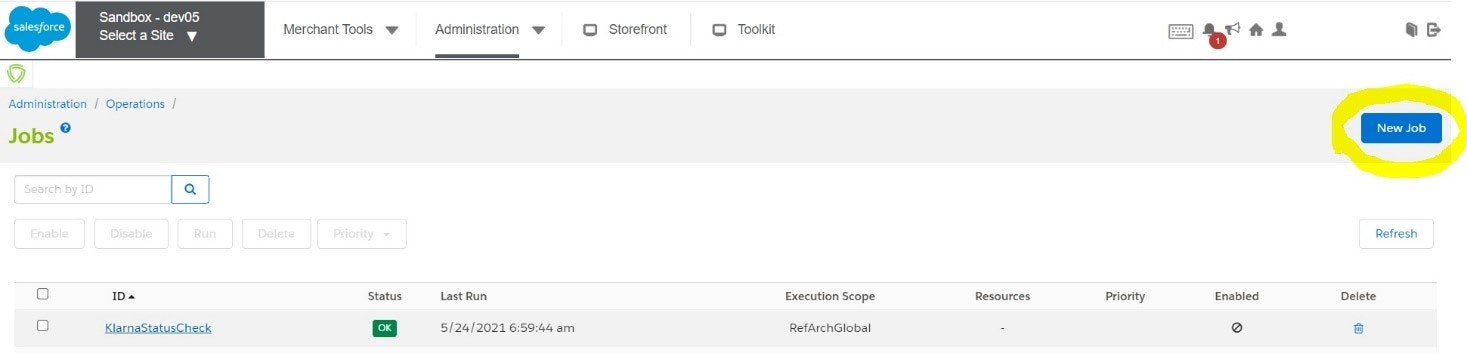
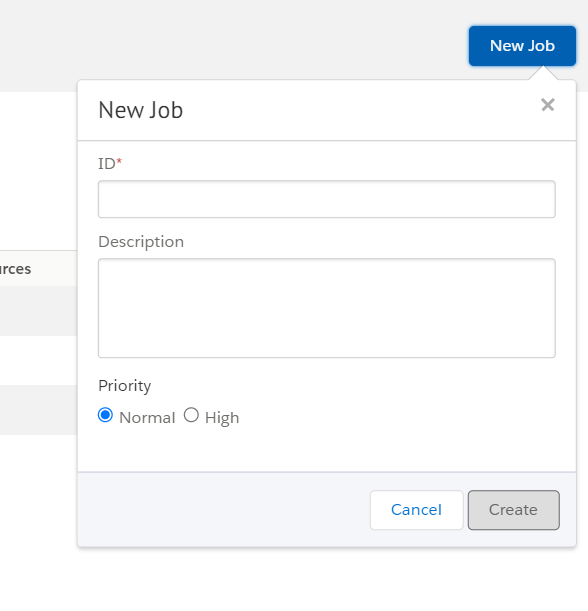
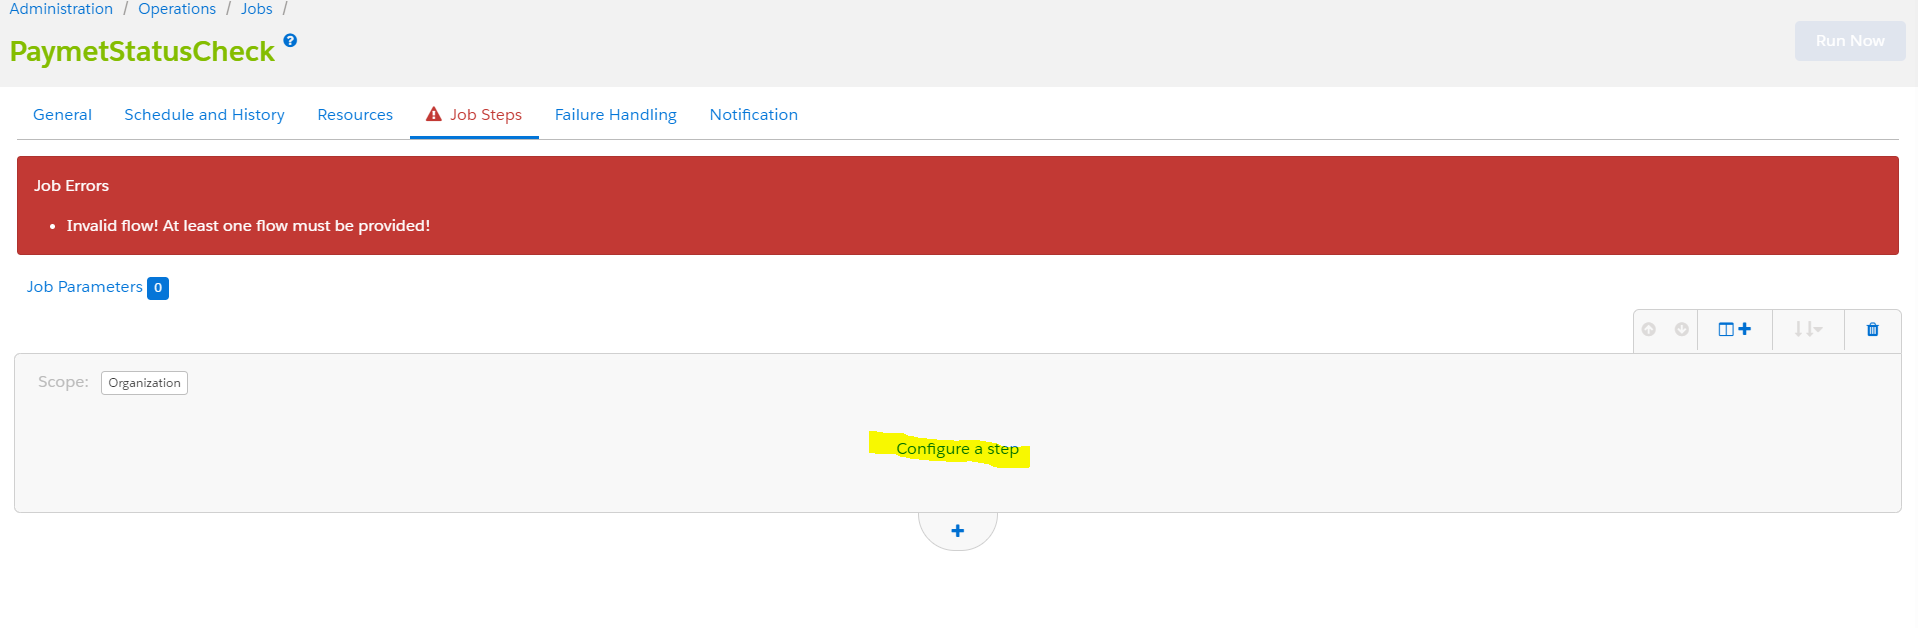
5.2.1 - Go to the BM, select Administration > Operations > Jobs. Click on New Job, on the top right-hand side of your screen, and enter ID.


5.2.1 Step Installation
Click the + button to install the step in Update Job (Image A), then click the Configure a step link .
A


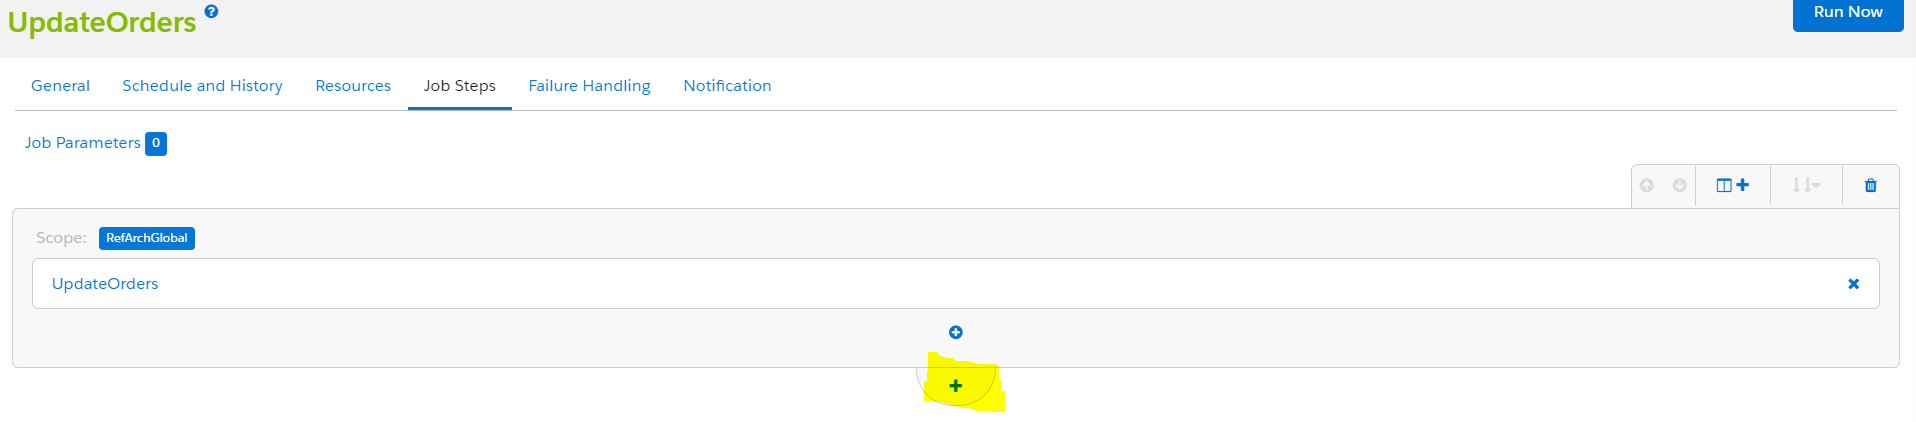
B


In the search section, type GestPay and then select custom.GestPay.StatusCheck.